Showing posts with label guest post. Show all posts

Monday, May 19, 2014

GUEST POST: Gold and Purple Studs

Hello All! I'm Amy and I blog over at The Fancy Side. I'm so happy Katherine is having me on her corner of the internet today. We belong to the same polish bloggers group on FB and she recently asked for guest posters. I love making new friends, so here I am! If you don't know me, I'm a midwestern girl who has recently relocated to the Big Apple. It's a crazy city but my little family and I like it. ;-)

For the look I created for you all, I started with a base of OPI Dutch Ya' Just Love OPI? This is a beautiful dark berry purple polish that is filled with the most amazing copper shimmer. That shimmer was hard to capture, but it's amazing out in the sun light.


Friday, January 25, 2013

GUEST POST FROM MANDY @ CHAMELEON STAMPEDE

Hi Everyone!
I'm excited to be spending some time in Katherine's world today!  My name is Mandy and my blog is the Chameleon Stampede.  It's so much fun to stop in and meet new polish lovers!  I hope you like what I have for you today :)

I actually posted this mani on my blog last September.  You can take a look at the original post here. I loved wearing it so much and I thought it would be great to show you in the rambles of a polish addict blog.

This is 2 coats of Nubar Reclaim which is an amazing holo grassy green. On top I stamped a mixture of Butter London Primrose Hill Picnic and Orly Pointe Blanche.  If you've seen Primrose Hill Picnic you know that it's a bright pink cream.  But, when you stamp it on green it pulls sort of a purple color that I just love.  I mixed it with white to get variations in the flower petals.  The bottom picture is a close up of my thumb because it was my favorite nail with this pattern :)

Thanks Katherine for letting me stop by and share with you and your friends!
-Mandy

Sunday, December 23, 2012

GUEST POST FROM GOSIA @ COLORFULCRACK.COM

Hi guys!!

My name is Gosia and I’m a host of Life In Color!.  Recently Katherine had asked a group of us on Facebook if we would like to guest post on her blog and I just couldn’t say no!  I love helping out fellow bloggers!!

Katherine asked that we do something Christmassy.  I figured that I’ve done snowflakes already, and snowmen, and a holly, and presents… but I haven’t done the bells!  And since “Jingle Bells” is one of my favorite Holiday songs, I’ve decided to put them on my nails.

I started out with OPI “Holiday Glow”, a chocolate brown polish with silver and reddish shimmer and microglitter.  I gotta say with disappointment that I’m not crazy about it!!!  It looks a lot better on other people IMO.  Formula is not too bad on this, but it took 3 coats to achieve full opacity.
I dressed it up with sponging on a mix of Nicole by OPI “Glitter In My Stocking” and Nicole by OPI “Orna-Ment for Each Other”.  These two are like two exact opposites of each other; “Glitter” is gold glitter with some red, and “Orna-Ment” is red glitter with some gold.


My accent nail has 2 coats of OPI “Alpine Snow” and is stamped with bells from Cheeky Jumbo plate L and Orly “Luxe” with Revlon “Red Rocks”.


I hope you guys enjoyed my holiday manicure!!  Katherine, thank you so much for letting me entertain your readers!!  I hope you all have wonderful and peaceful holidays =)


Friday, December 21, 2012

GUEST POST FROM HELENA @ NAIL WISH

Hi Everyone!

First of all I wanted to say thank you to Katherine from Nail Art and Sims for letting me do a Christmas Guest Post for her blog. First of all I want to introduce me; my name is Helena from the Nail Art Blog “Nail Wish”. I’ve been painting my nails since I stopped biting my nails, like 4 years ago… Then I fell in love with the Nail Art World and my obsession with nail polish started. I am the proud owner of ore that 200 polish bottles!!

I am already doing two Christmas Challenges (if you want to have a look just check here on my blog) and I wanted to do for Katherine, something that I haven’t done yet, and I ended up with this.


I am sure you all know what has been my inspiration, but I’m going to tell you anyway… Christmas Swirl Candy!!! I started with two coats of this amazing polish that is China Glaze Ruby Pumps (Red jelly base with lots of super sparkly red glitter), and then I freehanded the swirls in white with Acrilyc Paint and a Nail Art Brush.


For this guest post I wanted to do something special and Christmassy. In the beginning I was going to do something more special for her and her blog, but then I caught a cold and now I am not feeling very well… So I did something easier and then, when I get better I will give her the other special Christmas manicure ;)


I hope you all liked it and thank you for reading!! 

And of course Thank You again Kathering for giving me this oportunity, you are an amazing artist and I love your Sim’s Stories!!
Bye-bye!


Thursday, December 20, 2012

GUEST POST FROM ENIGMATIC-RAMBLES

Base polish: ELF - Red Velvet
Stamping Plates: Bundle Monster BM214, BM319, Konad M57
Stamping Polish: Barry M - Matte White

I had great fun doing my first guest post here on Nail Art and Sims don't think I did too badly for my first Fair Isle nails attempt! I used to be such a big fan of the Sims but it lags horrifically on my laptop these days. If you liked this nail art then maybe you can check out my blog: www.enigmatic-rambles.com

Wednesday, December 19, 2012

GUEST POST FROM ANASTACIA @ yecatsnz.blogspot.com


Yay!

Guest posting for a lovely lady, and its my first one!

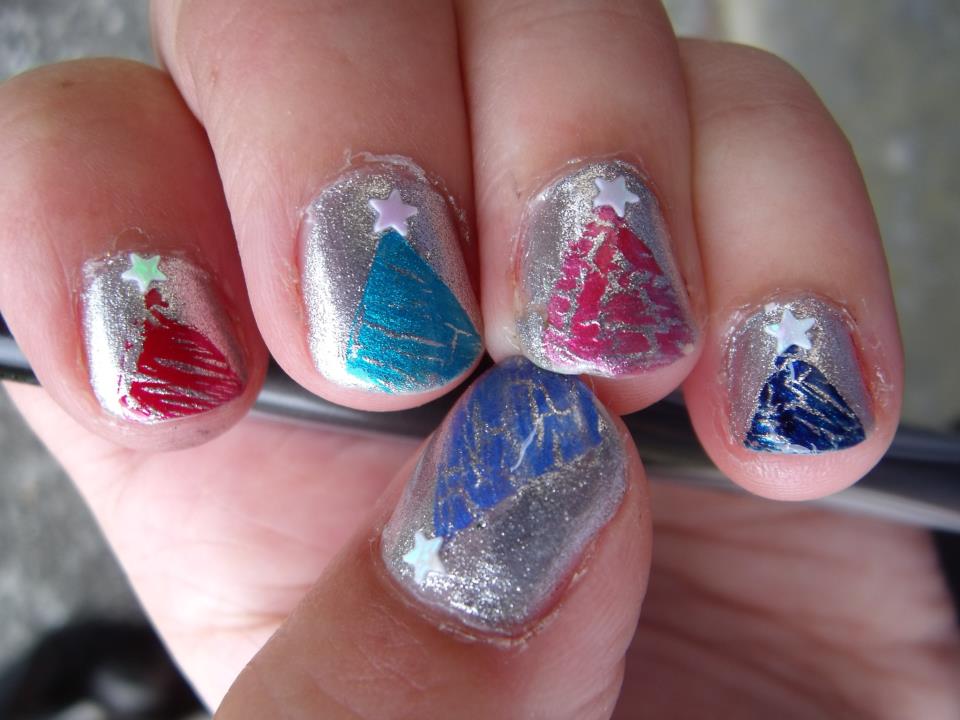
The theme is christmas, and I wanted to reflect on the variety of trees you can buy now.  And experiment with OPI Shatters.

So, for the lovely Katherine, we have SHINY CHRISTMAS CRACKLE TREES!!


Polish used:  Kleancolor Pearl Silver, OPI Shatter in Navy, Pink, Red, Turquoise and Blue.  Nail Deco Stars.


Turned out better than I expected.  I kinda sorta love it.

And because you can't have a nail art and sims blog without the sims...


Thanks heaps for letting me do a mani for you.  It was a lot of fun :)

-YecatsNZ

Tuesday, December 18, 2012

GUEST POST FROM SKYE @ CURLY POLISH


Hello and welcome one and all to my guest post for the lovely Katherine of Nail Art and the Sims! I am Skye of Curly Polish and I hope that you like what I have to show you today :-)

I would just like to apologise in advance for some of the blurrier pictures; I intermittently have very shaky hands and these were the best pics I was able to get when I did this mani - I could barely hold the camera still :-/


In the spirit of Katherine's request for Christmassy manis, I have a wintry mani to show you today. I chose to do a snowflake mani as these are some of my favourite designs at the moment and I'd never tried them before. Looking back, this isn't strictly a Christmas idea, but hopefully my heroic efforts at nail art will make up for that in your eyes :-)


The guilty parties stand to attention!
The polishes I used for this mani were:
  • Collection 2000 Hot Looks - # 23 Show Off (blue shimmer)
  • Rimmel Pro Finish - #420 Aqua Cool (blue creme)
  • Model's Own nail art pen (silver)
  • Essence Stamping Polish (white creme)
  • Collection 2000 - #20 Cloud Nine (white shimmer)
  • Collection 2000 Sparkle Topcoat


Firstly, let me show you my snow-kissed masterpiece:

Yay! It's winter on my nails!
This angle reveals the depth of the snow
and my best snowflake (ring finger)!

This is the most intricate mani I've EVER done and I'm quite proud of it. Given my shakiness that day, it took quite some doing, but I think the end result was worth it :-) Apart from the snowflakes, themselves, I think my favourite part of this mani has to be the shimmer-to-creme gradient which added so much depth to my design - I can't stop staring at my nails every time they catch the light!

Read on for more info on how I did it, and for a swatch of the base colour :-)


How did I do it?
An elegant work in progress: I just love the two tones here! 
I could have stopped here, as the mani was looking quite delicate, 
but in the end I decided to stick to the plan.

Firstly, I used two coats of my base colour (the blue shimmer). I then decided to sponge on a cornflower-blue creme to give my mani some nice wintry depth, and to add an interesting contrast. I normally don't like to wear blue polishes as they tend to wash me out with their cool tones, however, this warm creme is one of my favourite colours and I will have to swatch it properly for y'all soon! I then freehanded some snowflakes and stars (asterisks) on top of this. I'm a person with very shaky hands and when I did this mani, the shaking was particularly bad. I'm also a bit heavy-handed at times, and so I ended up having too much polish coming out of my nail art pen towards the end of my drawing. As a result, some of my snowflakes look less like flakes and more like blobs... but I think I did a good job mostly :-)

As you can see above, I used a nice thick white polish (Essence stamping polish) to dab some snow onto my tips. I chose a thick polish because this would give my 'snow' more texture and depth. Further down the tips I tried to create some brush strokes for this same reason. I then added dots of a shimmery white polish for more depth (see this post on my blog for a full-nail swatch) and topped off the snow with a shimmery silver top coat. Unfortunately, this last polish is virtually invisible in my photos, but it makes the snow look real frosty in person :-)


Finally, I'd like to show you the base coat I used for this mani - an electric/ice-blue shimmer. I don't use this polish very often, because I realised a few years ago that it made my fingers looked like the motorway signs in Scotland (where I lived for three years). Having since moved back down to England, I should perhaps wear the colour again as I received a fair few compliments before I covered it up with snow ;-)

A beautiful blue base

Interestingly, this mani is the first that's made me wonder about the direction of my art. Do I do it so it faces me the right way up (as I have to see my hands all day), or do I do it so that y'all can see my art the right way up? This mani sorta works both ways - though I actually like it best your way up - but this may be a real dilemma for me in the future! What do you guys prefer? Let me know in the comments!


I hope you all enjoyed this post, even despite its length. My posts are NOT normally this long; I am quite a wordy person by nature, but I also added some extra info here that I don't normally offer (e.g. my how-to), because I really liked this mani and wanted to share my thought process with you. I hope it gave you a good insight into
my approach :-)

I also hope that you'll consider checking out my own blog to see what else I've come up with; just click on the link in the introduction or find me on FB under 'Curly Polish' :-)

No matter what you do now, I wish you a very Merry Christmas, Happy Hanukkah/Kwanzaa and Happy Holidays wherever you are in the world, as well as peace and happiness for the New Year. Have a great holiday and keep your loved ones close <3

'Til next time :-)

- Skye x