Hi y'all! I'm back again! I'm so sorry I disappeared but I guess life happened. I've been hard at work on my school because I am determined to get my diploma so I can go to school to be a nail tech. DETERMINED. There's also been some stuff that's happened in the last couple months that's made things a little crazy. But I sat down tonight and decided to practice some roses because I was bored and it's something I need to work on, so I thought I'd share it here. I'll show some more and explain a little more about where I've been after the jump!
Showing posts with label la colors. Show all posts
Wednesday, March 16, 2016
Tuesday, June 9, 2015
31 day challengeL Gradient nails
Hi y'all! We're back again today to continue the 31 day challenge! Today's theme for the challenge is gradient nails. I wanted something bright and fun to counter act all the rain we've been having lately! I hate it as it is, but it's definitely getting old now.
For these I decided on doing a circle gradient because.. it was a little different than the usual gradient. Plus, I've never done one before, so I also get to try something new at the same time. Fun, right? Right!
For these I started with a base of Sinful Colors Snow Me White and then I used Broadway nails Sunflower and LA Colors in Pumpin' Pink and Flicker to do the gradient. Just painted all the colors on a make up sponge and sponged them on. I wasn't too happy with how they turned out - this technique needs a lot of practice, but I think it was okay for a first try.
Annnd just for fun! I haven't shown you guys Valentina in a while. This is what we call a "Dead Bunny Flop" and Tina is an EXPERT at them. Imagine walking into the room and seeing that and getting no response whatsoever because bunny is in a super deep sleep.
It's heart attack inducing. I'm not even kidding. I freak out every single time.
Then she lifts and ear, or twitches her nose. Or her favorite, chewing or washing her face in her sleep which I guess she must be dreaming about eating or something and I take a great big deep breathe and go 'omg okay your fine' and she looks at me like 'wtf mom I was comfy and tired. now go away'
Thanks for reading! Let me know what you thought in the comments below!
Thursday, May 21, 2015
31 day challenge - metallic nails!
hi y'all! I have another nail art look for you all today! Another of the 31 day challenge looks, this one is for metalic nails! I had no clue what to do with these so I just had fun with it.
I used LA Colors Live for the metallic base color and then I used black acrylic paint and a detail brush to make a heart and some zebra stripes on the nails. For the accent nail, I used scotch tape and cut it into a chevron shape. I placed it on the nail, painted over it, and pulled it off. Then outlined the shape with black paint.
I also have a fun video tutorial for you all to go along with this!
Thanks for reading! Let me know what you thought in the comments below!
Wednesday, May 13, 2015
born pretty store stamping plate L010
Hi y'all! I have another review for you all today! This is another stamping plate from born pretty store, which I was sent free of charge to review! This is stamping plate L010 and it's an aztec pattern/themed plate. This was also so much fun to play with! Please ignore the wonky looking middle finger nail. It broke and I did acrylic to fix it until it grows out. It looked much better before I painted it! I think i've fixed it up not though.
Anyway, to the stamping plate! For this look, I used LA Colors La Creme for my base color. Also the native american head on the right finger, I painted with acrylic paints. I left the image on my stamper, filled in the feathers. Let the paint dry then put a clear coat over it and used it like a decal. It's my favorite part of this mani!
You can see the crooked pattern on my ring finger. One of the reasons I HATE stamping. I can never do it right, haha. The stamping plate itself worked really well though! I had no problem at all picking up the images, unless like my pinky. I scraped the polish away too hard and pulled away too much. My own fault, not the plates. The images on this one were really cute too. I actually picked it because of the tribal prints with the elephants and giraffe silhouettes in it but the rest were an awesome bonus as well!
And my dad is really into history and the native americans. Religion and culture, stuff like that. So he was even excited about my nails when I showed him these!
If you like this plate you can grab it right here. It sells for about $5.99
Thursday, May 7, 2015
31 day challenge: Blue nails!
Hi ya'll! I have some more nail art for the 31 day challenge to share with you all today! These were a lot of fun to do and they follow the 'blue' prompt. I looove blue so I was so excited to work with a blue nail base.
Has anyone seen this commercial? Surely you have, but this is the best screenshot I could find/get from it, of the item I was after. These nails were inspired by the dress in this commercial. I just LOVE blue and orange together and when I seen this dress I just HAD to do nails like that, perfect fo the blue nail theme too, right?
For these nails I used Wet N Wild Chambray Showers And Listening ToBlue Reed, as well as Sinful Colors Snow Me White the base color is Chambray showers then I randomly dotted all three colors on a make up sponge and sponged over the nail to get a bit of a textured look. More depth to the look if you will. The flowers were done with Acrylic paint, orange and yellow and various mixes of those two colors to get the shade I wanted for them. Then the centers are dotted in with LA Colors Cactus and I just LOVE how all of these look! So much fun! And I'm getting so much better and more confident in my flowers. Mostly just super duper simple type flowers, but either way, they are flowers and they don't look horrible!
Thanks for reading! Let me know what you thought in the comments below!
Thursday, April 30, 2015
31 day challenge: Yellow nails!
Hi y'all! I'm back again with my yellow nails for the 31 day challenge! I decided on spring-y bumble bees, which I've done before, but I like the way these have turned out much better! It's a little weird doing this challenge all on my own, but it usually turns out that way anyways. It seems no one wants to do challenges or anything else with me BIG FAT SAD FACE.
Anyways. For my yellow nails I used LA Colors Daisy and for the accent nail I used Sally Hansen Breezy Blue and everything else was done with acrylic paint and a detail brush. These were super fun and so easy to do!
Thanks for reading! Let me know what you thought in the comments below!
Tuesday, April 28, 2015
31 day challenge: orange nails
Hi y'all! I'm continuing the 31 day challenge today with the theme of orange nails! I decided to do orange slice nails just because I thought they would be fun and I've done them before so wanted to see how I could change them up and see the improvement since the last time which was back in 2012! I think there was a bit of improvement, and there is DEFINITELY a difference in the pictures! I've learn a lot in the last two years since those were posted! Anyways.
I started these off with LA Colors Orange Crush making half circle shapes on the tips of my nails and two coats over the whole nail for the accent nails. I used white acrylic paint to paint the orange slice design (all freehanded) and then I used some Fimo Can slices that look like oranges to add a bit extra to the look. (Just like the first time around ;) )
Thanks for reading! Let me know what you thought in the comments below and keep an eye out for the yellow nails for the next part of the challenge!
Tuesday, April 21, 2015
Neon Tribal Gradient!
Hi y'all! I've got some tribal neon gradients to share with you all today! These were super simple and fun to do! Please just exuse the rabbit fur in the picture - I didn't realize it was even there until I was editing just a second or so before writing this up. The joys or our awesome furkids, right? I know some of you have cats and have the same problem with the fur.
Anyways, these were wasy to do, you just need a make up sponge and your four colors of choice for the background. I chose to use neons, but you can use pastels or whatever you want if you don't like such a bright look.
For mine, I used two coats of Sinful Colors Snow Me White to start with and when that was dry I used a damp make up sponge and painted on my four colors in the areas I wanted each. I used Broadway Nails Sun Flower and Sour Apple (Orange and Green) and LA Colors Pumpin' Pink and Flicker (pink and yellow) for this look. But any neons you want would work the same! If you're using neons though, you def want a white underneath to make them really pop.
After I had my gradient built up to a nice opacity and looking the way I wanted it too, I cleaned up around my nails, then took my detail brush and black acrylic paint and did some simple lines to make a tribal look over the background. You could leave it as is with just gradient as well if you'd like, but that was too boring for my taste personally, and also, I like that the black design kinda brings the brightness down a little bit.
Thanks for reading! Let me know what you thought in the comments below!
Tuesday, April 14, 2015
Born Pretty Store Full Nail Water Decals!
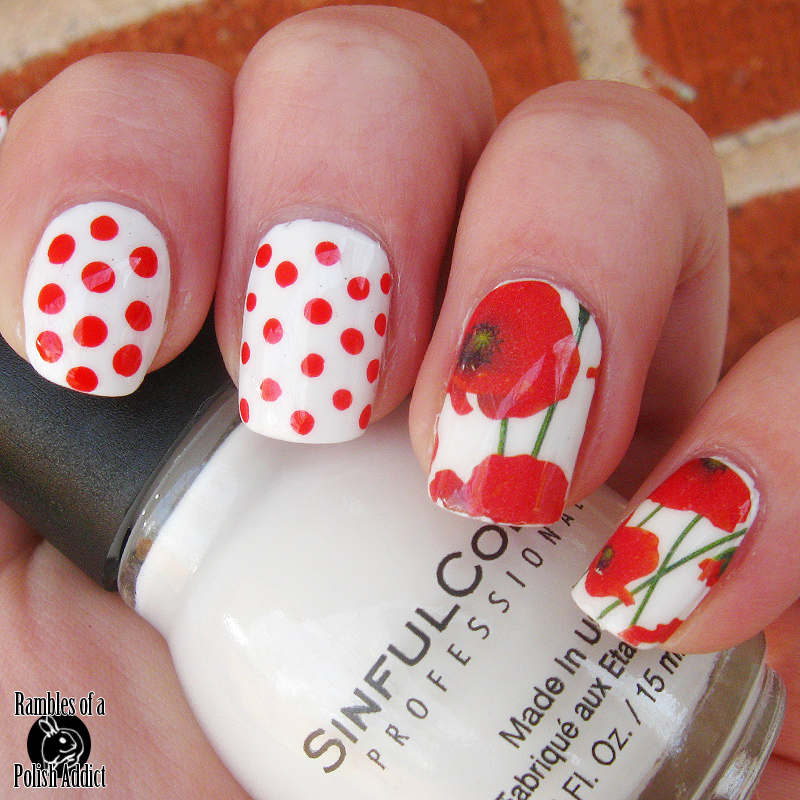
Hi guys! I have one more born pretty store item to show you all after this! This was sent to me free of charge in exchange for a review and I loooove them! Just look how cute those flowers are! These are so so so easy to use too! This was the first time I used a full nail decal but they were so amazingly perfect and easy to apply! They were a little on the small side though, the smallest two just barely fit the nails I used them on, but they could be used for a partial decal if they're too small for your nails!
I used Sinful Colors Snow Me White as the base color, and the dots are an LA Colors mini. It came in a two pack with a purple mini and the pack itself was called Bloody Mary but the nail polishes themselves didn't have names on them.
They came in a package like this, and there are ten decals total and I chose to only use two as an accent for this look. But you could do all ten nails, or only one, if you wanted to.
They're made super simple to use by the directions on the back of the package. Except for one thing. It says to soak them in water, then slide them onto the nail off the paper backing. This is wrong. If you do this you'll get a solid white decal with the flowers barely showing through from the front.
What you want to do if remove the protective plastic from the front of the decal after you cut out the piece you want to use. Soak it in water for about 10-15 second. Then either using your fingers or tweezers, separate the paper backing from the decal and place it onto the nail. While it's still wet, slide it around to get it into the right position, (Make sure the polish underneath is totally dry before even starting the decal process), smooth it out to get any kinks and wrinkles out. let it dry, then fold over any excess at the tip and file it away then add your top coat and tada!
These are super easy, and would be great for those that would love to get more detailed designs, or even just simple designs, but aren't any good at nail art!
Thanks for reading! Let me know what you thought in the comments below!!
Thursday, April 9, 2015
Born Pretty Store Nail art Charms!

Hi y'all! I have some more items from born pretty store to share with you all today! These items were sent to me free of charge in exchange for a review!
I have a couple of cute little nail charms for you all today and I looooved them! They are so cute and totally reuseable! Go ahead and follow the jump to see more pictures and more about these items!
Labels:
born pretty store,
charms,
dots,
dotticure,
la colors,
lace,
nail art,
polka dots,
review,
reviews,
stripes,
wet n wild
Sunday, April 5, 2015
Happy Easter!
I got some sparkley text now! Woooot! :D :D It needed a lot of sparkles, lol.
Hi y'all! I had some Easter nail art for you all today! And Bunday! Me and Valentina are just wishing everyone a safe and happy holiday! Hope you enjoy your dinners and egg hunts, or whatever you do to celebrate the day! And if you don't celebrate Easter, then.. Happy whatever holiday you do celebrate! As you can see, Valentina was not amused by my little photoshoot with her the other night. She's obviously too good for that treatment and should just get treats and head rubs instead. Plus I moved her babies to use in the picture! *Gasp* How dare me. (the stuffed animals you can see behind her, are her babies, lol. Tina doesn't have actualy babies)
There were a lot of polishes used here so let me try to remember them all.
There was Wet N Wild French tip, Tickled Pink, and Retro Mint and then there was LA Colors Bliss, and Daisy and I used Sinful colors Snow Me White under my decals for a base.
There were so many colors because they just weren't cooperating for the water marble for me at all, so I had to keep trying different ones, but I still had the dried marbled polish laying around, so I ended up just making what I could, work for a decal. I like how they came out actually. I thought the water marble would be sort of like an Easter Egg look. The bunny was painted with acrylic paints. And It's kind of terrifying, so sorry about that.
Labels:
animals,
bunday,
bunday sunday,
bunny,
easter,
holidays,
la colors,
nail art,
sinful colors,
studs,
wet n wild
Thursday, April 2, 2015
Born Pretty Store Round Resin Rhinestones!
Hi y'all! Today I have some nail art studs to share with you all from born pretty store! These were sent to me free of charge in exchange for a review! I'm really not great with studs, but these looked cute and fun so I grabbed them in my item pick!
There were super fun to play with and I loooved the colors!
Tuesday, March 24, 2015
Striped and pattterned nails!
Hi y'all! Trying to keep up with this posting regularly trend I've got going here! I've mostly just gotta keep myself editing and writing this posted in a timely manner! I let time get away from me most of the time! Anyways, I have these.. I don't know what to call them? Stripes with a geometric print? Hmm? Any thoughts on what to call them? Anyways. I really enjoyed doing these so I hope you like them as well!
I started this off with my base color LA Colors Meadow and then I added a strip down the middle with Sinful Colors Snow Me White before adding LA Colors Flicker on top of that! I used the white to make sure the neon yellow really *POPPED* over the teal-ish color.
When that was dry, I took my detail brush, and I mixed a dab of black with my metalic white acrylic paint to make a silver color, then I added a zig zag pattern over the yellow, and then two stripes down the side of the thick yellow one. They were so fun! And made me sooo so ready for summer! I'm tired of this rainy and cold weather!
Thanks for reading! Hope you liked it! Let me know what you thought in the comments below!
Thursday, March 19, 2015
Double dotted dotticure!
Hi y'all! I promise I'm trying to get into the hang of posting regularly! I will get it eventually! I just need more inspiration for nail art that doesn't involve doing the same thing over and over again. That gets boring, amirite? Anyways, I have these dotted nails to show you all today!
Base color is Sinful Colors Tempest and then I used a dotting tool and two different colors to dot. The pinky got a little wonky, I think there was something stuck to my dotted and it wouldn't dot right :( But the dot colors are Teal: LA Colors Seafoam, Pink: Pumpin' Pink and I LOVED the color combination on these so much!
Thanks for reading and hope you enjoyed the post! Let me know what you thought in the comments below!
Tuesday, February 24, 2015
ORange skittle nails!
Hi y'all! I have some more nail art to share with you all today! I wanted something a little more bright and summery, and we'd had some nice weather for a couple days so it was the perfect time! Plus, my mom had bought me a couple new polishes and I needed and excuse to use them.
I started this off with two coats of LA Colors Orange Crush and I had wanted daisies, but I don't know what happened. they came out looking more like fried eggs, haha. Then I did stripes on the pinky, and I've never done chevron stripes so I really wanted to try them out! All the details were don't with acrylic paint.
Hope you all enjoyed this as much as I did! Let me know what you thought in the comments below!
Thursday, January 15, 2015
Polar Bear Nails!
Hi y'all! I have some more nails to share with you all today! These were suppose to be some Polar bears and cold snowy sort of thing. The cold and snowy thing worked well... but those don't really look like polar bears? Some sort of cute little creature maybe! Maybe a ferret? I don't know. I think it came out cute, just not as what I meant for it to be, lol.
Any ways, I use LA Colors Blue Icicles for this look. It was really sheer! It took three coats to get it this opaque and it probably could have used one more to get even better coverage, I'd probably recommend four if you were wearing it alone, but since I was covering most of it with art. There was a LOT of glitter pay off in that bottle too! The little critters were painted with acrylic paint and a detail brush.
Hope you all enjoyed this look! Let me know what you thought in the comments below!
Tuesday, January 13, 2015
LA Colors - Candy Sprinkles!
Hi y'all! Something SUPER exciting today! I finally finally FINALLY got this polish!! This is something I've been looking for, for well over a year now. I started seeing them pop up around christmas time 2013. And have been looking ever since. I'd pretty much given up hope that I would ever find my own bottle. Well, I was out shopping before Christmas, went to sallys for a few things and thought 'i'll run next door to family dollar cause I'm low on top coat..' Welp! Got in there and they apparently don't sell my top coat there anymore :( BUT, as I was ready to leave, defeated that I didn't get what I needed, I see a shelf of gift box sets, and individual polishes. Once I spotted the LA Colors display? I forget ALL ABOUT that top coat cause OMG a WHOLE SHELF full of Candy Sprinkles, that super hard to find color that I thought I'd NEVER get. But there it was! So of course I grabbed it up. (I should have took the whole shelf full, I know) and I grabbed one other one called 'Blue Icicle' which is basically the same thing.. but in blue. Such pretty colors! And while I don't do swatches here a lot of colors I bought myself, well.. I needed posts for the blog and as soon as I got home I just HAD to paint my nails with this, so here we are!
For a short little review - I was ALMOST disappointed with how this looked in the bottle compared to pictures I'd seen. And even more so when I painted on the first coat; First coat was so sheer and had so little glitter I thought I was going to need 5+ of them to get full opaqueness. Then I did the second coat. And I FELL IN LOVE. It looked even better in person than in pictures! So so much better! Second coat cause total opaqueness and there was SO MUCH GLITTER. Much more glitter than I excited. I love it! Soo, this is two coats shown in the picture with one coat of Sally Hansen Instadri top coat. (The one in the red bottle)
Hope you all enjoyed this! Let me know what you thought in the comments below!
Tuesday, January 6, 2015
Snowflakes on Gradient background!
Hi y'all! I have some more nail art to share with you all today! And starting today I will hopefully be getting into a regular posting schedule while I explained in my last post here. I hope everyone had a good Holiday, Merry Christmas and Happy New Years and all of that! We've made it through another year! How exciting! And look at that cute ring I get to start the year off including in pictures! I got it from BornPrettyStore for less than a dollar which was awesome. Even if it did take four weeks to get, haha. But let me stop rambling and get on to the nail art.
I started these off with one base coat of white Sinful Colors Snow Me White but any white you have will get the job done. Then I use a make up sponge and LA Colors Meadow and Seafoam along with Snow Me White to make the gradient. I then topped that with one coat of Creations By Lynda Rainbow In The Dark (even though you can't really see it) and one coat of Sally Hansen Pearly Whites. Annnd then for the snowflakes I used a tiny little detail brush and blue and white acrylic paints. I really loved how these came out too!
Hope you all enjoyed these! Let me know what you thought in the comments below!
Tuesday, October 28, 2014
Dry Water Marble!
Hi y'all! I have some more Halloween nail art for you this week! The last of the Halloween nail art! I really wish I had had time to do so much more than I did, so many idea in my head that I didn't get to put to use! Oh well, save them for next year, right?
for these I used Wet N Wild The Clock Strikes Orange as the base, and Ebony Hates Chris, and Eggplant, along with LA Colors Mint to do this dry water marble! Easy enough to do! Just place dots of color and use a dotter or tooth pick to swirl the colors together while it's still wet. I never like how dry water marbles look for me though so I wasn't really happy with this look!
Hope you all enjoyed this post! Let me know what you thought in the comments below!!
Tuesday, October 21, 2014
Halloween Patch Work!
Hi y'all! Today I have some simple fall patch work nails to share with you all! These didn't come out exactly the way I was hoping they would, but they were still super cute and I loved them a ton.
And the pictures came out ALL WRONG. Why? Because the camera was used for something else during the week and I forgot to switch the settings back. Why didn't I just fix this? I didn't even notice until I went to edit pictures today. So, please excuse the odd coloring on the picture.
Anyways! I used Sinful Colors Snow Me White as the base color for these and the green is La Colors Mint And the rest of the colors were done with acrylic paints and a tiny little detail brush. Super fun halloween and fall type colors!
Hope you all enjoyed these as much as I did! Let me know what you thought in the comments below!
Subscribe to:
Posts (Atom)