Showing posts with label let it snow winter challenge. Show all posts

Monday, February 3, 2014

Let It Snow Winter Challenge; Butterfly/fairy Wings

 Hi y'all! Today I have some fun Fairy wing nail art for you as part of the let it snow winter challenge. I can't believe it's just about over! Only two more days! (Which I actually probably won't do myself, undecided on that as of yet) and please don't mind the pictures too much, I was playing with my camera and flash settings to try and gets better ones and these were the best of this play session, haha. 

Friday, January 31, 2014

Let It Snow Winter Challenge; Half Moons

 Hi y'all! Today we have some half moon nail art for the Let It Snow challenge. Today's theme was obviously half moons and I love doing half moons so much so I was excited about this. I also love the purple and gold color combination. So lets get to it! 

Monday, January 27, 2014

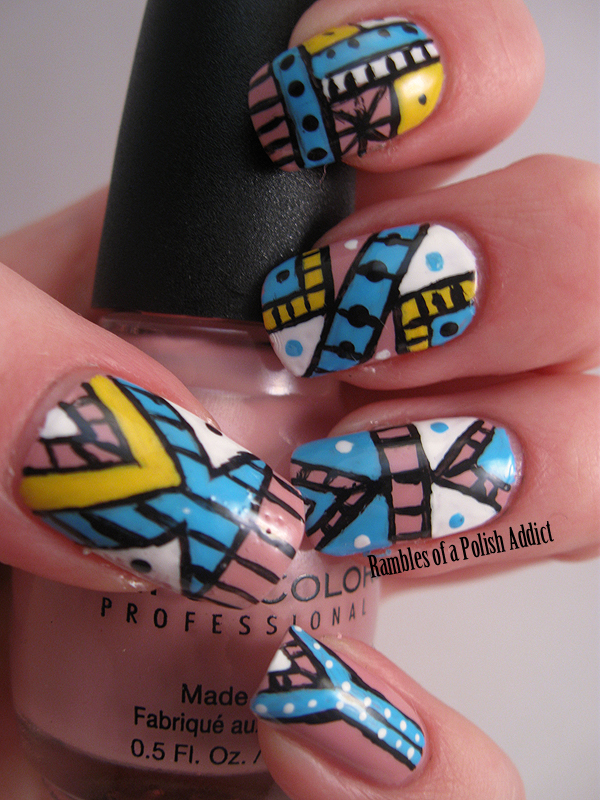
Let It Snow Winter Challenge; Tribal

Tribal nail art with sinful colors polish in starfish
 Hi y'all! Today I have some tribal nail art as part of the let it snow winter challenge for you all. We're just about at the end of the challenge, I have no idea what I'm doing after this one's over, but I'll find something! But anyways, onto the nail art! 

Friday, January 24, 2014

Let It Snow Winter Challenge; Igloo

 Hi y'all! I have some igloo nail art for you all today as part of the let it snow challenge! We're so close to the end! I wasn't sure at all what to do with this one so I came up with this icy colored brick pattern to look like the bricks of an Igloo. There's also a video on how to get this look up on my facebook page so check that out! 

Monday, January 20, 2014

Let It Snow Winter Challenge; Dots

 Hi y'all! I have some gradient dots for you all today for the Let It Snow Winter Challenge. The theme for the day was dots, and I decided to do something a little different than just some plain ol' polka dots. These were really fun to do! 

Friday, January 17, 2014

Let It Snow Winter Challenge; Winter hats/mitten/scarves

 Hi y'all! Today I have some fun Christmas sweater nail art for you all as part of the Let It Snow Challenge. I know it's past Christmas but to be fair, they're not really Christmas-y. The theme for the say was  winter Hats/mittens/scarves and the Christmas sweater look was something I really wanted to try this past year and didn't get a chance to. And sweater count as a winter clothing item right? Right!

Monday, January 13, 2014

Let It Snow Winter Challenge; Stripes!

 Hi y'all! I have some fun nautical stripes for you today for the Let It Snow Challenge. The theme for the day was stripes and I've been wanting to do some nautical nail art so it was the perfect excuse to do it finally. 
 I started out with a base color of Sinful Colors Rain Storm for the dark blue, then I used white acrylic paint and a striping brush to make the stripes and the shape of the anchor. 
I then went over the white anchor with LA Colors in Deluxe to get the gold and added a dot at the top with a dotting tool, then used Rain Storm again to make a smaller dot inside the gold one. I was pretty excited with how these turned out. 

Be sure to check out the rest of the challenge themes and all the other ladies stripe manis below! And let me know what you think in the comments!


Friday, January 10, 2014

Let It Snow Winter Challenge; Snow Leopard

Hi y'all! I have some leopard print nail art for you all today for the Let It Snow Winter Challenge. The theme was snow leopard, but I just couldn't do just the same exact thing on all of my nails because it would drive me nuts. Plus there's only so much you can do with snow leopard so I thought it would make them a little different than the rest as well. 
 I started with a base color of LA Colors Lost Soul and I used Wet N Wild A Blank Canvas for the white spots, and Lacquered Bliss Polish Take Charge for the purple spots. I used a tooth pick and black acrylic paint for the black. 

The white spotted ones are the snow leopard (Yeah I know it should be the opposite but I don't like wearing white like that too often.) and the purple spot ones were inspired by my bed sheets. It has a leopard/zebra pattern on it in light grays, purples and white. So I used the purple spotted leopard print pattern on them to inspire these. 

Let me know what you think of these in the comments, and be sure to check out the rest of the challenge themes as well as the other ladies Snow Leopard looks below!


Monday, January 6, 2014

Let It Snow Winter Challenge; Snowman


 Hi y'all! I have some snowman nail art for the Let It Snow Winter Challenge to share with you all today which features Frosty the Snowman. I know Frosty is a Christmas thing and that's past, but to be fair, I painted these before Christmas and plus, I just wanted something fun and not just a plain boring snowman, and hey, hopefully it's different from everyone elses snow man nails this way? 


Friday, January 3, 2014

Let It Snow Challenge; Snowflakes

 Hi y'all! Another challenge mani for you all today! And also the first post of 2014! Woo! Todays theme is snowflakes, and I've never done them before so I was sort of excited to try them out. My Pinky was a fail, and I wanted to use colors that weren't going to be crazy over done. 

Monday, December 30, 2013

Let It Snow Challenge; New Years!

 Hi y'all! Another challenge day for you all today! We're getting close to the end now! Well.. about half way there at least anyways. Todays challenge theme is New Years! And well.. New Years makes me think of all things sparkly so this is what I came up with for the theme. 

The base color is Wet N Wild I Need a Refresh-Mint and on the ring finger is two coats of Cabaret I used LA Colors Live for the stars and dots and the black in acrylic paint. It came out much better than expected as I suck at doing stars! haha. 

Be sure to check out the rest of the challenge themes and all the other ladies New Years! Manis below!


Monday, December 23, 2013

Let It Snow Winter Challenge; Christmas!

 Hi y'all! Today I have another Let It Snow challenge mani for you all! The theme for the day is Christmas, and you can definitely interpret that theme however you want, Christmas trees, lights, presents, anything you want related to the holiday works for the theme. For me, I went with something a little different than what most other will probably do, Grinch nails! 

I looove Dr. Seuss, but I'm not really a Christmas fan. No really, we could skip the holiday all together along with the entire winter season and I would be just fine. BUT I do love the Grinch, mostly for it's story more than the relation to Christmas. But all of Dr. Seuss's stories are the same. They have a certain message in them and I just love them all. 

ANYWAYS. For these nails I started with a base of Sally Hansen Xtreme Wear Breezy Blue and all the rest of the details are done with acrylic paint. I did the Grinch face on my ring finger with his Santa suit and a Christmas tree on the middle finger, and the other's i just did strings of lights. I was really super happy with how these turned out. Just ignore the messyness around the sides of the index finger, I went to open my bottle of white acrylic paint and got a big glop of it on my finger, and in my hurry to wipe it off my nail before it dried, it just smeared everywhere else and turned into a huge mess and I thought I had all of it off til I was editing pictures.  

Let me know in the comments below what you think of this mani, and be sure to check out the themes for the rest of the challenge, along with the other ladies Christmas manis. 


Friday, December 20, 2013

Let It Snow Winter Challenge; Candy Canes

Hi y'all! Another challenge mani for you all! Today's them is Candy Canes and I did this neat stripe look for it too look like the little minty candy cane candies. My favorite were always the spearmint ones because I'm not a huge fan of peppermint myself, so I just did the red ones as an accent. I really like how these turned out. 

I used Wet N Wild A Blank Canvas as a base on the accent nail, and Sally Hansen Xtreme Wear Mint Sorbet for the base of all the other nails. Then I used a small nail art brush and red and green acrylic paints to make the stripes on the nail. I was really surprised and happy with how these came out. 


Let me know what you think in the comments below and also check out the other candy cane nails and the rest of the challenge themes! 


Monday, December 16, 2013

Let It Snow Winter Challenge; Water Marble

 Hi y'all! Another challenge day! and todays theme is water marble. My water marble sort of failed and I didn't want to post them. But I also didn't want to redo them either. I hate that whole mess of a process and I was frustrated already so no way was I attempting to redo them. SO I thought, how can I make them look decent? And ta-da! Zebra print! I left my favorite alone as an accent and used some black acrylic paint and a small nail art brush to make the zebra print. Problem was solved! 

I used Wet N Wild Teal Slowly And Fall and A Blank Canvas for the water marble, black acrylic paint for the zebra stripes, and NYC matte top coat to make the whole thing matte. 

Let me know what you think in the comments below and check out everyone elses water marble manis as well! 


Friday, December 13, 2013

Let It Snow Winter Challenge; Winter Flowers

Hi y'all! I have another challenge mani for you today! Today's theme was Winter Flowers and well.. I might have just did the flower part of it myself, haha. Not very good at that. I'm not too happy with this look, or the pictures, my camera just wasn't cooperating with me, so I only have one picture to show you above. 

The base color is Wet N Wild Retro Mint and the rest of the details are acrylic paints. 

Check out all the other themes and everyone elses flower looks below 


Monday, December 9, 2013

Let It Snow Winter Challenge; Owls

 Hi y'all! Another Challenge day for you all! Today's theme was owls, and I was planning on keeping a strictly black and white theme for this look as a 'snow owl' of sorts, this popped in my head and I just couldn't pass it up. 
I've done owls before, but this is a little different, which is what I wanted. I didn't want to just do the same ol' owl again. And this is what came out. The base of the actual owl is LA Colors Cactus and the white is Wet N Wild A Blank Canvas and then the gold nail is LA Colors Deluxe with two coats of Cocktail on top of it. The rest of the details were done with acrylic paints. 

Check out the rest of the challenge themes and everyone elses owl manis below. 


Friday, December 6, 2013

Let It Snow Challenge; Galaxies + Pictorial

Hi y'all! Today is the fourth day of the Let It Snow Winter Challenge and the theme for the day is Galaxy nails. I did them a little different than the norm though. A few months ago I seen someone do a tutorial on youtube I believe for galaxy nails that were all pink and purple instead of the usual black, purple, blue, etc, of normal galaxy nails and since then I've wanted to recreate them and just hadn't got the chance. Well, this challenge was perfect for it since it's one of the themes only.. pink doesn't really remind me of winter, so I used blues and teals instead and made my own version of it. I also have a little pictorial for it below. 

To start off as usual we're gonna grab all our supplies. Several different shades of blue and teal polish along with white acrylic paint (or polish if you prefer) and a glitter topper for the 'stars'

For this look, I used Wet N Wild Teal Slowly And Fall, and Listening To Blue Reed, LA Colors Seafoam, and Meadow and Sinful Colors Rainstorm Along with China Glaze Fairy Dust for my topper. Keep in mind you can use anything you have that are similar to these color, or use you're own color scheme altogether and forget about the blues. Use pinks, or purples, oranges, or yellows, whatever you like! 

1) I first started off with my base coat and then two coats of Teal Slowly And Fall and then I used a small piece of make up sponge and sponged on Rainstorm in random spots and shapes. Do however much you like, it just depends on how much of the base color you want to show. I would suggest always start sponging with you're darkest color first though. 

2) I then sponged on Listening To Blue Reed next to the darker blues and over the darker blue in some spots. 

3) Just keep sponging on the colors you're using until it looks the way you want it too. Here I've Added Meadow and Seafoam along with sponging my base color on in some spots where I thought it should show more than it did. You really can just keep adding the colors until you're happy with the look you have. 

4) Add you're glitter topper to smooth things out a little, blend all the colors together, and then using a small brush and acetone, clean up around the edges where the sponging got messy. 

5) For the last step, use a small paint brush, tooth pick, or dotting tool, which ever you're more comofortable using and add in some stars. One or two larger ones and some little dots for smaller ones. Use your white paint or polish for this part. Once that's dry, seal it all in and smooth it out with you're favorite top coat and you're done! 

Hope you all enjoyed both the nail art and the tutorial and hope you'll check out the rest of the themes for the challenge and everyone elses galaxy nails below! 


Monday, December 2, 2013

Let It Snow Challenge; Penguins + Pictorial

Hi Y'all! Third day of the Let It Snow Challenge which I'm hosting with Polished By Audison and today's theme is Penguins, which I also included a tutorial for so keep reading if you'd like to know how to do these cute little animal nails! 


So first off grab your supplies. I again, prefer acrylic paints for my art as it's easier to use and dries much much faster. But you can use polish in place of the paints if you'd prefer. 

I used NYC New York Color Black Lace for my base color, I also use LA Colors base/top coat for my base coat, and Sally Hansen Instadri Anit Chip Top Coat. I used white, black, and orange acrylic paints, along with a small paint brush and a dotting tool and tooth pick. So gather what you need for the look you're doing, any colors you want as these are your penguins, this is just the colors i chose to do mine in. 

1) Once you're base color is dry use the white acrylic paint (Or polish, whatever your preference) and the small paint brush and make a heart shape in the center of the nail. For me, I find it a lot easier to get a decent heart if I do it in sections. I start with a dot where I want the bottom point to be, then a dot directly above that where I want the point where the two humps to meet at and draw a line straight down, then I draw a 'V' shape coming from the bottom point, shaping the bottom of the heart, then start shaping the top part from there one side at a time. If you need to correct anything, like I actually did, you can then use your base color (black in my case) and go around the edge of the shape until you get it to a way you're happy with it. 

2) Take your dotting tool and black paint (Or polish) and make to large dots in the rounded part of the hearts for the eyes. 

3) While you wait for the eyes to dry a little bit, get your brush back and your orange acrylic paint (or polish) and make little triangle shapes under the eyes to make the mouth, by time you're done with this, you're black dots should be dry enough that you can use a tooth pick and white acrylic paint (or polish) and place a tiny little white dot in the eyes. 

4) Use your tooth pick (or brush, which ever you're more comfortable with) and make little 'V' shapes at the bottom of the heart shape on each side to make little penguin feet. 

5) Add your favorite top coat to seal in the design and add an awesome shine while smoothing everything out and you're done! Keep in mind if you're using acrylic paints, this step is especially important or you're design will eventually start to wash off within a couple days or less as the paints wash off with soap and water. 

Hope you enjoyed! Check out the other themes coming up below along with everyone elses penguin nails! 


Friday, November 29, 2013

Let It Snow Challenge; Gradient

Hi y'all! Second day of the Let It Snow Winter Challenge and I'm actually really happy with how these turned out! The Theme was gradient and I wanted something soft, subtle, and wintery to go alone with the challenge. I think I got just that. 

I used a nude ( Wet N Wild 2% milk ), A light gray, ( LA Colors Lost Soul ), and a white (Wet N Wild A Blank Canvas ). and then I topped it all off with Kilox Opulent Top Coat and it came out really nice! a subtle gradient effect and the colors blended really well together! I have a tutorial on gradients here if anyone would like to check that out as well. 

Check out the links below to view everyone elses Gradient's for the challenge as well as the rest of the upcoming themes! 


Monday, November 25, 2013

Let It Snow Challenge - Thanksgiving

Hi y'all! It's time to start up a new challenge! I missed doing them, I looove doing them, They're lots of fun and provide some inspiration when you're stuck on what to do. This one I'm co-hosting with Polished By Audison, which by the way, if you're not already, you should run over and follower her because she does some pretty awesome nail are along with AMAAAZING Water Marbles. But anyways on to the nail art for todays challenge theme.

The first theme in our challenge is Thanksgiving. We both know that yes, this is technically a fall holiday and shouldn't really be in a winter challenge, but it's our challenge, and we can do what we want, plus, it's a perfect place to start at. 

For mine I did some Charlie Brown Thanksgiving nail art! Woo! I did a gradient of sorts, which is really subtle and apparently my camera didn't think being able to see it was necessary. The base is Sally Hansen Instadri Red-io Active and then I used LA Colors Cactus and Sinful Colors Courtney Orange to make the gradient. I have Snoopy on my ring finger, I'm pretty happy with how he came out, and I have Woodstock on my index finger. I'm not so happy with Woodstock to be honest. He doesn't quite look right as I didn't get the shape of him right to start with, knew it, couldn't get the black paint off, and just went with what I had to work with without completely redoing that nail. I think it's pretty decent as it is anyways, just could have been better. All the details are done with Acrylic paint by the way. 
Hope you all enjoyed these nails and check out the rest of the themes of the challenge as well as everyone elses Thanksgiving looks below!