Showing posts with label glitter. Show all posts

Saturday, December 5, 2015

Snowflakes! + bornprettystore review!

Hi y'all! I'm back with another blog post! I'm doing the clairestelle8 challenge for December which is hosted on instagram right here. I've also got a few items from bornprettystore I used in this post as well! 

To start with I did a gradient with Wet N Wild French White Tip, Teal Slowly And See, and Chambray Showers. That was topped with KiloX Opulent Top Coat. The ring finger I used chevron striping tape from born pretty store which they sent to me free of charge in exchange for review. It worked just as well as any other striping tape and I got this cute little pattern on my nails with it! Cute!
You can get it here for about $1.47

For the snowflakes I used metallic acrylic paint and a liner brush which was also sent to me by born pretty store to review. This brush wasn't my favorite just because it could have been smaller for better details, but it worked well otherwise! 

You can get the brush here.

Thanks for reading and let me know what you thought in the comments below!

Sunday, July 5, 2015

Late: 4th of July and bornprettystore review!

Hi y'all! I meant to get this up yesterday! Which means y'all get two blog posts today because I have another post I've been meaning to get up as well! These were some Fourth Of July nails I did using the press samples I received from Sally Hansen as well as some I received from Born Pretty Store! 

I used all three of the Sally Hansen Fourth Of July Shades for this. The Base is Vandal Eyes and I sponged on the other two Tag Ur It! And Quick Brick to make a sort of galaxy type effect with a coat of the Big Glitter Top Coat in Costume Glitters over that! 

Once that was dry I used some french tip guide stickers I received from Born Pretty Store to do the accent nail. I used a chevron shaped guide and used the detail brush I got from them as well to outline on each side of the guide. Then I used the same brush to fill in some extra details and add the dots. 

The guides were pretty easy to use! Just make sure the polish is SUPER DUPER Dry before placing the stickers. And I recommend sticking them on your skin and pulling them off a couple times before placing them over your polish as they're really sticky and that'll weaken it a little. Making it less likely to pull the polish off when you remove them. 

You can get the brush here
And the french tip guides I received is a variety pack which you can get here for $6.39


Thursday, February 26, 2015

Creations by Lynda Hope Springs Eternal Collection!

 Hi ya'll! I've got some new polish to share with you all today! These are all from Creations by Lynda and will be released within the next few days! And I highly recommend you run and grab them as soon as you can if you're looking for some new spring polishes to add to your collection!! There are six polishs total in the collection, 4 creme colors, and 2 glitter toppers and I just LOOOVED all of them so much. 


 First is April Showers which is described by Lynda as a blueish gray with a hint of purple and a slight shimmer from spectraflare. To me it's a purply blue.. kind of a periwinkle maybe? A pale dusty periwinkle. The second photo below shows it closer to the color it is in person, but my camera was having a hard time deciding if it was purple or if it was blue. This is two easy coats shown with no top coat. Application was easy and it dried quick. There was a bit of pulling on the first coat.. but that could have just been me, or possibly the mini bottle brush. It evened itself out just fine on the second coat easily enough though, so no big deal at all. If it weren't for that, I almost could have gotten away with just one coat with these! Also, I promise the shimmer is there in person, but it's very subtle and my camera just refused to pick it up. (same goes with all of these colors!)


Thursday, February 12, 2015

Funky French Valentines!

Hi y'all! I have some cute valentine nail art for you all today! Also bright and fun because I miss the sun! Please come back soon sun! Haha. Anyways. Valentines day is coming up in a couple days and I decided to do something fun for the occasion! 

For this look I used Sinful Colors Soul Mate (Kinda perfect for the day of love, right? I didn't pick it on purpose haha) and for the accent nail, I finally put my Funky Fingers Glitter Matters to use! the purple and yellow were done with acrylic paint. I used a dotting tool to dot along the french tip (also freehanded. i couldn't find my tape?) and the round parts of the hearts were also done with a dotting tool, and then a detail brush to drag the two shapes together in a V shape to form the heart. Super easy and loved how cute these came out! 

Hope you all enjoyed these as much as I did! Let me know what you thought in the comments below! 

Thursday, February 5, 2015

Anti-Valentine day nail art!

Hi y'all! I have some more fun nail art to share with you all today! Really loved the accent nail on these the best! Sooo cute and the glitter and base color looked like they were made for each other!!! Please ignore the pinky, I swear they were fully dry but by time I got around to pictures, it was all smudged and wrinkley. 

For this look I started out with my base color Sinful Colors Enchanted and the accent nail is Wet N Wild How I Met Your Magenta which I topped off with 3 coants of Sinful Colors Decadent. I used Sally Hansen Big Glitter Top Coat MeteorLight on the pinky. The rest was all done with a detail brush and acrylic paint. I just make broken heart shapes and polka dots whitch I used white to make stand out more. 

Hop you all enjoyed these as much as I did! Let me know what you thought in the comments below! 

Tuesday, February 3, 2015

Pink Galaxies!

Hi y'all! I have another nail art look for you all today! I wanted to do some cute galaxy nails, but I wanted something a little different than the standard galaxy (It's almost spring. I need color and not black!). I've done galaxy nails a few times before. I've even done a blue/teal themed galaxy. I really love galaxy nails! They're so easy and simple to do, but look so much more detailed than they are. 

Anyways, for this look I used all Wet N Wild. The base color is Tickled Pink and the colors I used to sponge on the galaxy are Frosted Fuchsia, Chambray Showers, and Who Is Ultra Violet? I really loved the look of this! I used Sally Hansen Goldie-flecks for the glitter topper on it. I used the darker pink to make leopard spots on the ring fingers, all other colors (black and white) are acrylic paints! 

Hope you all enjoyed these! Let me know what you thought in the comments below! 

Tuesday, January 20, 2015

Penguin Nail Art!

funky fingers anna berried treasure pengions glitter bunny ring
Hi y'all! I have some more cute nail art for you all today! This time some adorable (adora-nail? Is that a thing? If not it is now) penguin nail art! I recently went and found my local Five and Below and had to have some of the Funky Fingers nail polishes. And the ones I've used I've loved so much I might have to go back and get more of them!! I used two of them in today's look, aren't they just the cutest? Anyways, on to the nail look. 

I started with my base coat to protect my natural nail. Then I painted on three coats of Funky Fingers Berried Treasure Which is just the cutest color! It's a very pale pinkish berry crelly (very much a crelly, very sheer one at that) with two different sized black hexes and smaller white hexes. Three coats almost was still too sheer, but I just like the 'almost see through but not quite see through' look on crelly polishes. There was more visible nail line in person, but you can barely tell in the picture. 

On all but the pointed and ring finger I added one coat of Funky Fingers Anna on top of the base color. This one is inspired by Anna from Disney's Frozen and is adorable! Oh wait.. It's Adora-nail! I WILL make that a thing. I promise you, I will. ANYWAYS. This is a glitter topper. There are small hexes in a dark purple and a pinkish purple (magenta maybe?) lots of little micro white hexes, and some larger white hexes. My favorite think in it though? The blue and white snowflake glitters!! They are SO SO Cute!! One problem, there is a lot of fishing to get them out. Just getting one on each nail took my much longer than I would have liked, but for the price point and the adora-nailness of this glitter topper, it was worth it. 

For the penguins, I used a tiny art brush and black, white, and orange acrylic paint. And I have definitely rambled for far too long now!! 

Hope you all enjoyed this look! Let me know what you thought in the comments below! 

Thursday, January 15, 2015

Polar Bear Nails!

Hi y'all! I have some more nails to share with you all today! These were suppose to be some Polar bears and cold snowy sort of thing. The cold and snowy thing worked well... but those don't really look like polar bears? Some sort of cute little creature maybe! Maybe a ferret? I don't know. I think it came out cute, just not as what I meant for it to be, lol. 

Any ways, I use LA Colors Blue Icicles for this look. It was really sheer! It took three coats to get it this opaque and it probably could have used one more to get even better coverage, I'd probably recommend four if you were wearing it alone, but since I was covering most of it with art. There was a LOT of glitter pay off in that bottle too! The little critters were painted with acrylic paint and a detail brush. 

Hope you all enjoyed this look! Let me know what you thought in the comments below! 

Tuesday, January 13, 2015

LA Colors - Candy Sprinkles!

LA Colors candy sprinkles
Hi y'all! Something SUPER exciting today! I finally finally FINALLY got this polish!! This is something I've been looking for, for well over a year now. I started seeing them pop up around christmas time 2013. And have been looking ever since. I'd pretty much given up hope that I would ever find my own bottle. Well, I was out shopping before Christmas, went to sallys for a few things and thought 'i'll run next door to family dollar cause I'm low on top coat..' Welp! Got in there and they apparently don't sell my top coat there anymore :( BUT, as I was ready to leave, defeated that I didn't get what I needed, I see a shelf of gift box sets, and individual polishes. Once I spotted the LA Colors display? I forget ALL ABOUT that top coat cause OMG a WHOLE SHELF full of Candy Sprinkles, that super hard to find color that I thought I'd NEVER get. But there it was! So of course I grabbed it up. (I should have took the whole shelf full, I know) and I grabbed one other one called 'Blue Icicle' which is basically the same thing.. but in blue. Such pretty colors! And while I don't do swatches here a lot of colors I bought myself, well.. I needed posts for the blog and as soon as I got home I just HAD to paint my nails with this, so here we are! 

For a short little review - I was ALMOST disappointed with how this looked in the bottle compared to pictures I'd seen. And even more so when I painted on the first coat; First coat was so sheer and had so little glitter I thought I was going to need 5+ of them to get full opaqueness. Then I did the second coat. And I FELL IN LOVE. It looked even better in person than in pictures! So so much better! Second coat cause total opaqueness and there was SO MUCH GLITTER. Much more glitter than I excited. I love it! Soo, this is two coats shown in the picture with one coat of Sally Hansen Instadri top coat. (The one in the red bottle)

Hope you all enjoyed this! Let me know what you thought in the comments below! 

Thursday, January 8, 2015

Glitter Gradient!

glitter gradient sinful colors sally hansen tempest big glitter top coat
H y'all! I have some more stuff to share with you today! These were some reviews I have to share with you. I got some of the holiday Big Glitter Top Coats from sally hansen but I just not got around to posting about them. (Of course.. I got them kind of late last month too so oh well) but they're so pretty! I used two of them here in this look. 

I started with two coats of Sinful Colors Tempest and New York Color Tropicoral. and then I used the Big Glitter Top Coats to make a gradient on the tips of the nails. I used Goldi-flecks on the purpble and MeteorLight on the bright coral. I thought they can out really pretty! Formula is pretty much the same on them both, not as densely packed as the other Big Glitter Top Coat's I've tried so far but definitely have plenty of glitter in them. I did use a sponge to sponge the glitter onto the tips more densely to create the gradient. But there was plenty of glitter added with just a normal 1-2 coats if you just wanted to add some sparkle to your look! 

Hope you all enjoyed this! Let me know what you thought in the comments below! 

Thursday, October 30, 2014

Halloween skittle nails!

**Sent free of charge from Sally Hansen for halloween posts!*
Hi ya'll! Today I have a skittle Halloween look to share with you all! I was sent several goodies from Sally Hansen and NYC for the Halloween season. I'll share a few thoughts on them as well as I loved them all! (Or well most of them) 

First up is the orange I used as a base on several fingers. Sally Hansen Instadri in Pumpkin Queen the formula on this one was amazing! It went on smooth and covered well in just two thin coats. It was also completely dry by time I finished the second hand! 

Second up, over the orange on the thumb is NYC's Rock Muse Smokey top coat. While I looove the idea of these smokey top coats. (Sally Hansen has one now too, correct?) I didn't like that this one had glitter in it. It kinda took away from the smokey effect it's suppose to have, right? At least for me it did. Sooo total bust on that one. Without the glitter it would have been perfect. If you like the glitter in it? Grab it. It did what it was suppose to. 

On the index finger is the Big Glitter Top Coat in Costume glitter by Sally Hansen. I put on two coats over black. Those are two rather thin coats as well and as you can see there is LOTS of coverage. You could probably add a third coat and get nearly full coverage from this glitter if you would like. Or use the sponge method which I still need to try on glitter polishes because I haven't yet! Anyways, if you love glitter, I would totally recommend grabbing this one if you can. There's another one too that has a gold glitter in it. I forget the name though. 

On the middle finger we have Sally Hansens Salon Effects Nail Stickers. The ones I received were called Skull and Crossbones and they are just the cutest and more sparkly little skulls ever! I love the look of them. I'll admit, I was iffy on using them, afraid I'd mess them up. I've never used a nail sticker before. (I also have a set of those real nail polish nail strips from Sally Hansen I have yet to try) But these were super easy to use! Just peel them off, line them up on the nail, and stick them on! Might have to stretch and pull in places a little bit to get out wrinkles and make them fit just right. Just fold the excess over the nail edge and file it off! Easy! I wouldn't recommend these if you're planning on them stayed for some time. I put top coat around the edges of mine like it recommends on the package for longer where, but I still only got about two days out of them. So if you want something cute and quick for a party or other special occasion? These are perfect! But for long term wear, I would skip them. 

Last up, but certainly not least, The pinky! The pinky is a base of the orange and two coats of Sally Hansen Fuzzy Coat in Fur-ankenstein and I loooove it! I love the fuzzy coats so much! I love how much coverage they give! So when I was offered the new Halloween ones I jumped at the chance to try them! There was one other in the set (something witch? was the name? I don't remember now.) and both looked amazing! This is the one I was sent though, and it's little yellow-green and black short bar glitters and looked amazing. Seriously, awesome move making fuzzy coats for Halloween! 

Hope you all enjoyed this post! Let me know what you thought in the comments below!  

Thursday, October 16, 2014

Simple pumpkin pattern nails

Hi y'all!  today I have some more nail art to show you! These are just some simple Halloween/fall themed nails. These actually came out much much better than I thought they would. Almost as good as I pictured them in my head! So much sparkleness added to that accent nail as well! So pretty. Make sure to click through the jump to see more on this Mani! 

Thursday, July 10, 2014

Stars and Stripes Drip Nails!

memorial-day-paint-drip-stars-and-stripes
Hi ya'll! Today I have some more nail art for you! This is what I had on my nails for Memorial Day. A little late in posting it though. (Or a lot late maybe? Not sure when this will go live.) But it's a stars and stripes, red, white, and blue drip Mani. I really loved how it turned out so much, though I wish I was a ton better at getting my "Drips" Just right. 

It was a fun weekend though, sister and family were over that Sunday, and the day before was spent going to the feed store. Valentina needed pellets, litter, and grass, so we were stocking up. It's cheaper to buy it there. They sell baby chicks there, which already bugs me cause they're in wire bottom cages which is sooo so bad for their feet, but they're so cute! They peck at your fingers cause they think they're worms. But they had baby bunnies this time, also in wire bottom cages, which is also, bad for their feet, causes sore hocks :( But they also had no hay at all, which is going to lead to them having major tooth issues later on, and they were crammed into a teeny tiny little cage where there was barely room for just one of them, nevermind the six that were crammed in there together. It makes me so sad when I see animals like that anywhere. I literally can't go anywhere near the fish at Walmart. BUT Anyways. Not the point of this post. Sooo click the jump through and I'll actually ramble about the nails instead of the poor animals.  

Friday, July 4, 2014

Happy Independence Day!


Hi y'all! I have some 4th of July nail art for you all today with some super cute firework nails going on, which is also doubling as a review for this Sally Hansen Color Frenzy Glitter Topper that the company sent me to review! 

This Mani didn't quite some out the way I hoped as the 'fireworks' didn't come out the way I wanted, but I really loved it other wise. And also? I am so tired right now while writing this, so please over look it if there are any spelling errors or anything like that. I think a nap is definitely on the schedule for today or I am never going to make it through. Anyways. Click through the jump to see more and what I thought about the glitter topper from Sally Hansen! 

Thursday, June 12, 2014

Three shades from the Sally Hansen Rio Collection

Hi y'all! I have the rest of the polishes I received to share with you all today. Today I have three of the eight shades from the Sally Hansen Rio Collection which should be out now. These are all matte glitter toppers in various colors inspired by the Brazil city of Rio. They are all such pretty colors and combinations as well! 

 To start off we have Beach Ball which is a clear base with hex matte red, white, and blue glitters. I really wish these polishes were packed with more of the glitters to get more onto the nail, but I still love them as is. This color really reminds me of something for the 4th of July, so it'd be perfect for your july 4th Manis! These were a bit tricky to apply, there's quite a bit of clear base compared to the glitter and you have to do a lot of dabbing to get even glitter coverage on the nail and it ends up getting pretty thick on the nail if you don't do it just right, but I think the result is worth the trouble. This is just one coat over NYC Amazon Green and no top coat. 

Monday, March 17, 2014

St Patricks day! Gold and Rainbows!

 Hi y'all! I have some more nail art for you all today! For the holiday as well! Being partly Irish myself, and I tend to enjoy a good drink. Wink wink. I love st. patricks day. And I have some nail art to share with you for it. I did gold with shamrocks and rainbows! Click through the jump to see more! 

Tuesday, March 11, 2014

Palm tree silhouette!

 Hi y'all! I think you can all tell by now by the posts I've been sharing that I'm definitely ready for summer/spring to come along. so over winter! But anyways, today I have some sunset inspired gradient nails with palm tree silhouettes. Palm trees are something I've been wanting to try for quite some time now, and now I've finally gotten around to it. I really love how they came out as well. Click the jump through to see more pictures and how I did this look! 

Monday, March 3, 2014

Skittle nails!

 Hi y'all! So I have a skittle mani for you all today! I bought a whole bunch of new polishes a few weeks ago and couldn't at all decide which one to use on my nails, so I just used as many as I possibly could in one mani. So click through the jump to see the thumb nail and what I used in this look! 

Wednesday, May 29, 2013

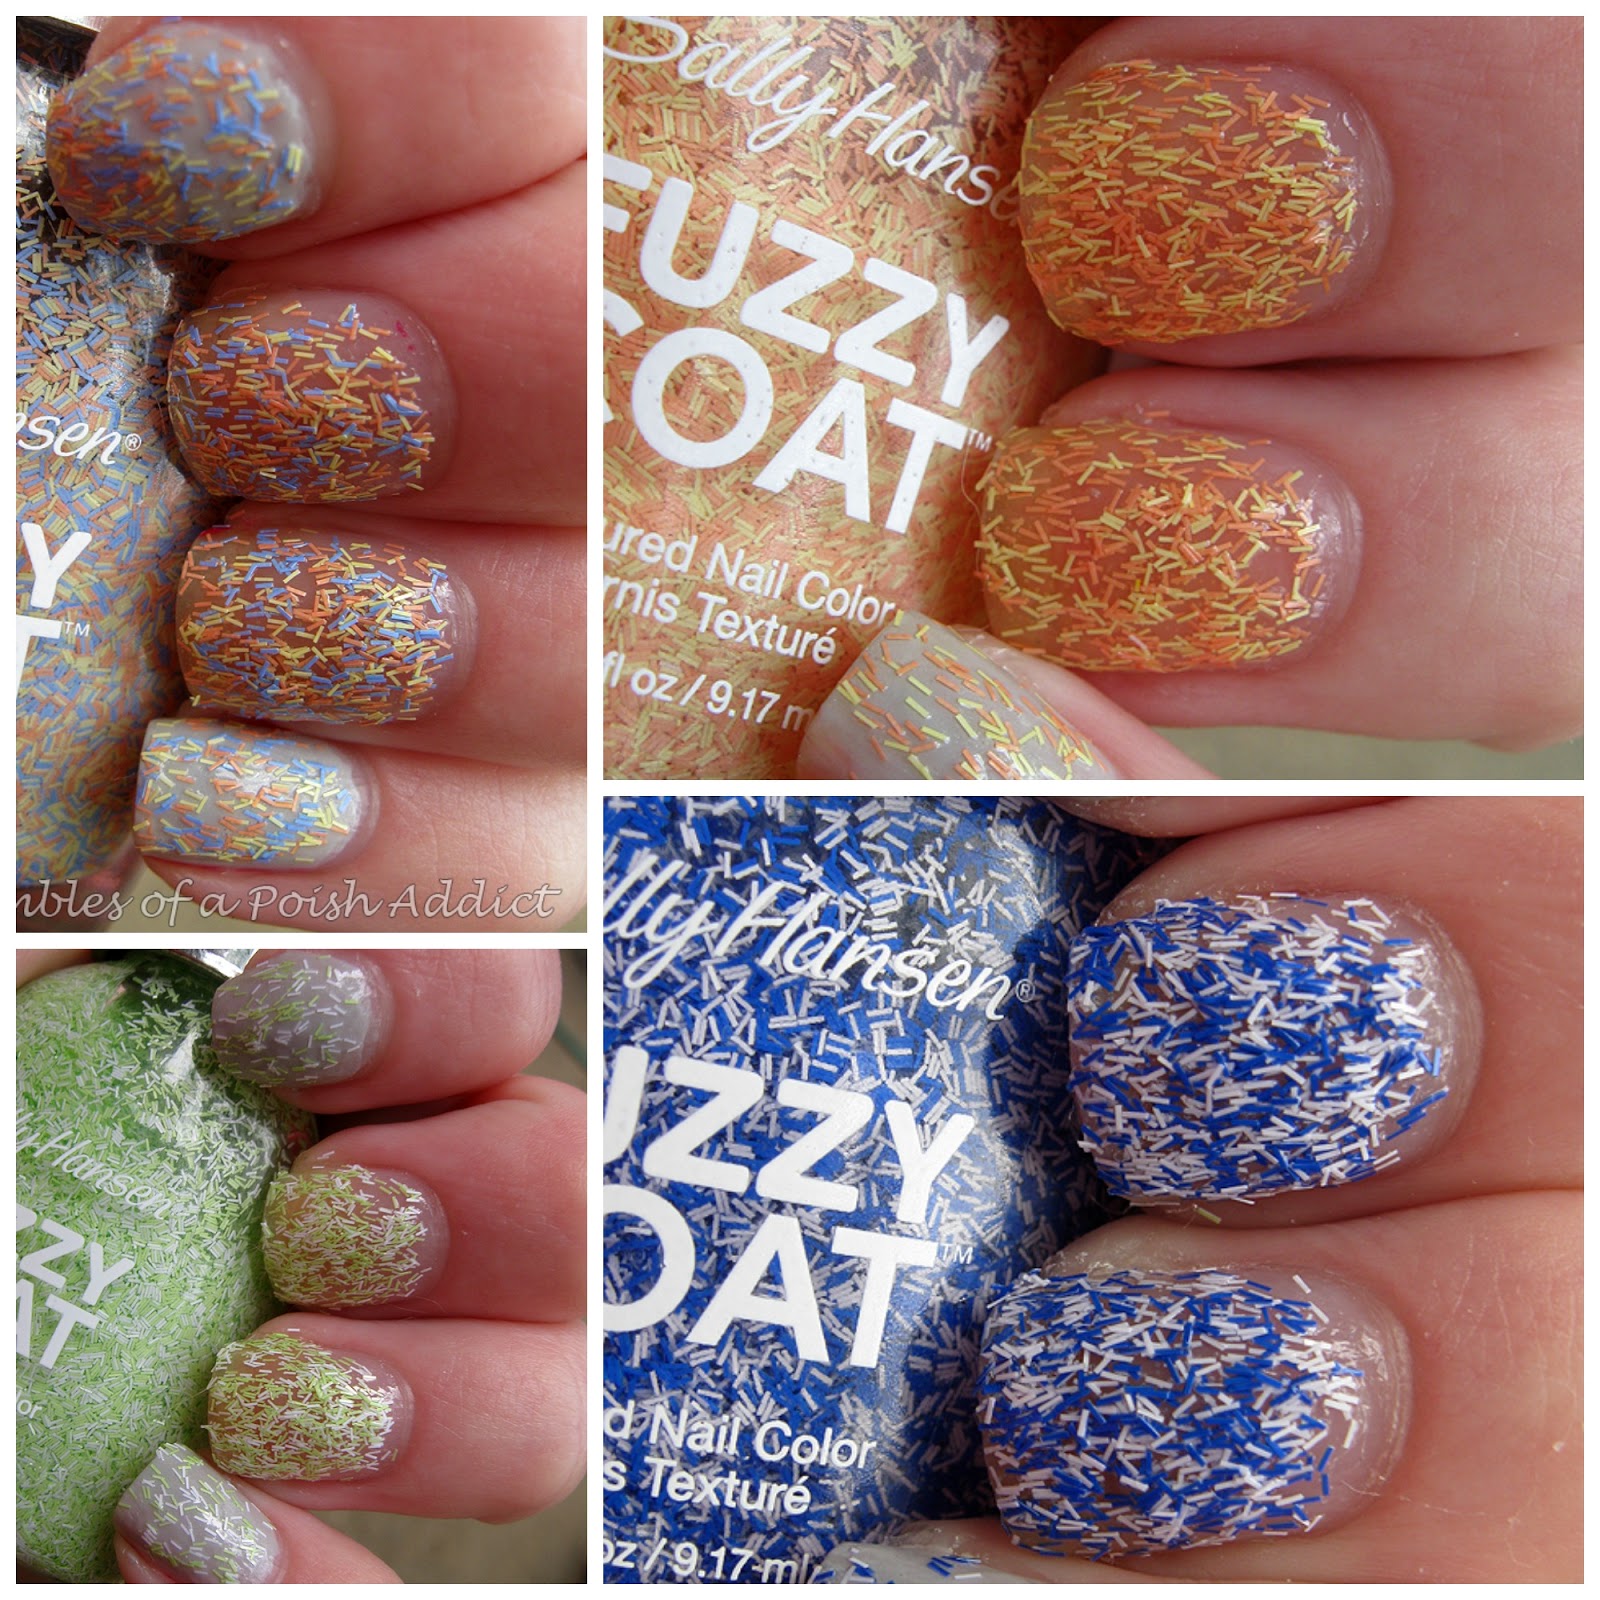
Sally Hansen Fuzzy Coat review and swatches

Today I have another review for you all! The rest of the Sally Hansen polishes I review. I already posted about the sugar coat polishes, and now I bring you the four fuzzy coat polishes that I received. I enjoyed these MUCH better than the sugar coats.. not that the sugar coats were bad quality or anything, I just don't like that textured look. 


Apparently, these fuzzy coats are dupes for the nails inc. feather effect nail polishes, but for a much cheaper, more affordable price for those of us that can't afford anything other than drug store brand polishes, but I can't compare or even tell you if they really are because I have no experience with the feather effect polishes, I actually had no idea they even existed until I started seeing these Sally Hansen polishes popping up everywhere. But now enough of my rambling, let's get on with the swatches and review! 

**these polishes were all sent to me by Sally Hansen for my honest review**

Friday, April 26, 2013

extra relaxed 31 day challenge day 9: rainbow

Today is week or day 9 of the extra relaxed 31 day challenge and the theme is rainbows. And I chose to do a dotted kind of rainbow.
There's so many colors here. The red is acrylic paint, the orange is wet n wild sunny side up, the yellow is sinful colors unicorn, the green is happy endings by sinful colors, la colors Aquatic is the blue, and the purple is a nail art striped by kiss that came in a set of three stripers. The accent finger is just black with two coats of ellagee polish crazy he calls me over it. Very pretty rainbow of glitters that was perfect for the theme! It's all topped off with a coat of china glaze fairy dust. 

what do you guys   think of these rainbow nails? Let me know in the comments below!