Showing posts with label Press sample. Show all posts

Wednesday, December 9, 2015

Reindeer and more born pretty store items!

reindeer nail art christmas rudolph red nose
Hi y'all! I'm back again with some more cute Christmas nail art and more brushes from bornprettystore! I had so much fun with these! 

First I started off with two coats of Sinful Colors Social Ladder and then I used some nail art brushes that I recieved for review from BornPrettyStore. The brushes worked great! It was a set of three, with one tiny detail brush, one flat brush, and one angled flat brush. My only complaint is that the detail brush could have been smaller but for filling in larger shapes like on some of the reindeer parts, it was great! I used all acrylic paint for the details of these as well, and the stripes as well! 

You can get the brushes right here for around $4.60, and if you use the code Ring10 you'll get 10% off your entire order! 

Thanks for reading and let me know what you thought in the comments below!

Saturday, December 5, 2015

Snowflakes! + bornprettystore review!

Hi y'all! I'm back with another blog post! I'm doing the clairestelle8 challenge for December which is hosted on instagram right here. I've also got a few items from bornprettystore I used in this post as well! 

To start with I did a gradient with Wet N Wild French White Tip, Teal Slowly And See, and Chambray Showers. That was topped with KiloX Opulent Top Coat. The ring finger I used chevron striping tape from born pretty store which they sent to me free of charge in exchange for review. It worked just as well as any other striping tape and I got this cute little pattern on my nails with it! Cute!
You can get it here for about $1.47

For the snowflakes I used metallic acrylic paint and a liner brush which was also sent to me by born pretty store to review. This brush wasn't my favorite just because it could have been smaller for better details, but it worked well otherwise! 

You can get the brush here.

Thanks for reading and let me know what you thought in the comments below!

Monday, August 10, 2015

Born Pretty Store Stamping Plate And Nail Ring!

Hi Y'all! So, I've been a bit MIA from the blog lately. That has nothing to do with how much I want to be blogging, and everything to do with lack of time lately. I've actually been going to the gym every day. (Except Sunday, but only cause they're closed Sunday, lol) And I've also started GED classes which I've been doing for the last few weeks. That takes up my evenings four days a week. The rest of the time? I've been using to study, or just haven't felt up to doing much besides sleep. So definitely haven't forgotten about this! I want to continue this blog more than you know! It's just getting hard to keep up with so I will post as often as I can. 

But with that said, Right before things got crazy, I got a package from Born Pretty Store. I got a few stamping plates, some stickers, and a nail ring. (Which is so cute by the way.) 

The ring is super cute and awesome! As shown in the picture above, it sits just above the cuticle and lookes like a little Princess tiara. It's adjustable, but a little hard to try to get to adjust, and it sits sort of weird to me but I'm also just not use to wearing rings. It comes in Silver and Gold so you get your choice in which you would prefer! I would definitely recommend it if you're into rings/jewelry. 

You can find it right here and it sells for about $3.36.

Second up in this post, is the stamping plate. I used Sally Hansen Tag 'Ur It for the base of this, and Konad special stamping polish in Black for the stamping. This is Born Pretty Store Plate BP-75 and I thought it was super cute with the feathers! It has three different full nail images with different feather patterns. It also has a single peacock feather, two different bird silhouettes, and a dragon design. I found it super cute and the images also transfer really well! It was so easy to use! (once I gave up on the squishy stamper. Those things are trash.) 

I would definitely recommend this plate if you're interested! It sells for about $2.99 and you can find it right here


Sunday, July 5, 2015

bornprettystore Stamping and studs!

Hi y'all! This is the second post for the day! and the last I promise! I don't wanna spam everyone too much! These are some more items I got to review from BornPrettyStore. There's a stamper, a stamping plate, and some studs including in this post. 

First up we'll do the studs. They come in a little jar and they have a mix of shapes in them. There are squares, circles, and a sort of tear drop shape? And there are also a variety of colors mixed in there. There's a pretty good amout of them to play with and they were easy enough to pick out the shape and color you want, I would probably separate them out if I had empty containers to put them into though. I had so much fun playing and trying to find a way to use them though. 

You can get them here and they cost about $2.86 for the little jar of them. 

Second up is the stamper I received. I was super excited about it being a squishy stamper being as how everyone always goes on and on about how GREAT they are. And let me tell you... if this is they're idea of a great easy to use stamper? I don't wanna know what a bad one is to them. I had SO MUCH trouble with it. I wouldn't get it to pick up the images. I prepped it in every single way I could find to prep it with out totally ruining it and still noting. It picks up images half way or not at all. I know it wasn't the plate itself either because my normal konad stamper picked up the image fine. I'm going to try one last thing to get it to work correctly before I write it off completely, but if that doesn't work? Then no. I don't recommend it unless you have experience with squishy stampers because I definitely can't figure this one out. 

It sells right here for $3.84 With the scraper included. 

Last up is the stamping plate I received! It's a "Music Themed" plate (It's actually Michael Jackson Themed, I picked it for the music note pattern and nothing else tbh)  with some pretty cute images on it.The plate worked great! The images are crisp and clear and pick up perfectly with my konad stamper. (And the few times I got the squishy stamper to work right) so I would definitely recommend this one if you're into the images on it! And it's super cheap as well! 

You can pick it up right here for just $0.99!  

Thanks for reading! 


Late: 4th of July and bornprettystore review!

Hi y'all! I meant to get this up yesterday! Which means y'all get two blog posts today because I have another post I've been meaning to get up as well! These were some Fourth Of July nails I did using the press samples I received from Sally Hansen as well as some I received from Born Pretty Store! 

I used all three of the Sally Hansen Fourth Of July Shades for this. The Base is Vandal Eyes and I sponged on the other two Tag Ur It! And Quick Brick to make a sort of galaxy type effect with a coat of the Big Glitter Top Coat in Costume Glitters over that! 

Once that was dry I used some french tip guide stickers I received from Born Pretty Store to do the accent nail. I used a chevron shaped guide and used the detail brush I got from them as well to outline on each side of the guide. Then I used the same brush to fill in some extra details and add the dots. 

The guides were pretty easy to use! Just make sure the polish is SUPER DUPER Dry before placing the stickers. And I recommend sticking them on your skin and pulling them off a couple times before placing them over your polish as they're really sticky and that'll weaken it a little. Making it less likely to pull the polish off when you remove them. 

You can get the brush here
And the french tip guides I received is a variety pack which you can get here for $6.39


Thursday, June 25, 2015

Sally Hansen - Quick Brick

Hi y'all! Sally Hansen recently sent me their newest Insta-Dri shades for the summer to review! I have this red, a blue and a white. First up I'm posting these red nails using Quick Brick and I just had to do a little something to spice up the swatch! 

The formula on this polish was great! It was pretty well covered with just one coat, the second coat was mostly needed to smooth everything out and make sure the color was even! This isn't a true "Red" polish though. It looks almost like one in the bottle in certain lights, but on the nails it dries a little darker than a true red, and it's just a shade or two off. I don't know how to explain it? Red to me, is red. It looks horrible on me so I hate it, haha. But I don't know, this color had a more blue undertone maybe? Or something? It reminds me of the 'Strawberry Red' Crayola crayon. Looks red when you grab it... til you draw with it and realize is the wrong red. It's a great color though and easy to apply if you like the color! 

As for the strawberry accent, it was all done using acrylic paints and my newest nail art brush from bornprettystore. So much fun! 

Thanks for reading! Let me know what you thought in the comments below! 

Tuesday, June 23, 2015

Watermelon nail art! + Bornprettystore brush review!

Hi y'all! I know I haven't been posting a lot, this is due to a LOT of nail breaks. Everytime I get them grown out a little or almost all even again, another one breaks. But, just this past sunday I've started taking Biotin and cut them all down even with the shortest one in hopes that they will grow out healthier. Maybe they just needed a fresh start! 

Anyways, these are my little nubbins now, I did some cute summer nail art with some press samples I've recieved lately! (I'll have a full swatch and review of the sally hansen ones as soon as I can. I'm trying to get a little more length first) 

I did these with a base coat of Sally Hansen Vandal Eyes and I used acrylic paints in pink, green, and black for the other details which were painted using a brush sent to me by bornprettystore! The brush is AMAZING! no seriously, if you're into nail art, and more on the advanced side of it, you should invest in one of these brushes (Or maybe ten so you have backups just in case.) I love it so much! And it's such a neat little tool! Comes in a package all nice and neat and has this nice little lid that goes over it like a pen to keep the brush from getting ruined from improper storage or just accidently setting it the wrong way or.. whatever! It's sooooo perfect! And it's so so tiny, even more so that I thought it would be when I picked it. So definitely pick one up if you love doing highly detailed designed with teeny tiny little pieces!  

You can get your very own for just $5.98 right here

Thanks for reading! Let me know what you thought in the comments below! 


Tuesday, June 2, 2015

Sally Hansen Miracle Gel review!

Hi y'all! I took last week off from the blog for reasons. I kept getting breaks in my nails and they needed a little time to start to grow out a little bit. I didn't want to be posting with total nubs! All the oldest breaks are growing out nicely though (pinky and middle finger) and even the newest (ring finger) is looking much better but wasn't as bad as the others to start with. I promise now though I'll try my best to keep a regular posting schedule! 

I was sent these polishes free of charge from Sally Hansen in exchange for a review. I got these three polishes plus a Miracle Gel Top Coat to use with them, and I had so much fun doing these swatches. Just click the jump to see them! 

Wednesday, May 13, 2015

born pretty store stamping plate L010

Hi y'all! I have another review for you all today! This is another stamping plate from born pretty store, which I was sent free of charge to review! This is stamping plate L010 and it's an aztec pattern/themed plate. This was also so much fun to play with! Please ignore the wonky looking middle finger nail. It broke and I did acrylic to fix it until it grows out. It looked much better before I painted it! I think i've fixed it up not though. 

Anyway, to the stamping plate! For this look, I used LA Colors La Creme for my base color. Also the native american head on the right finger, I painted with acrylic paints. I left the image on my stamper, filled in the feathers. Let the paint dry then put a clear coat over it and used it like a decal. It's my favorite part of this mani! 

You can see the crooked pattern on my ring finger. One of the reasons I HATE stamping. I can never do it right, haha. The stamping plate itself worked really well though! I had no problem at all picking up the images, unless like my pinky. I scraped the polish away too hard and pulled away too much. My own fault, not the plates. The images on this one were really cute too. I actually picked it because of the tribal prints with the elephants and giraffe silhouettes in it but the rest were an awesome bonus as well! 

And my dad is really into history and the native americans. Religion and culture, stuff like that. So he was even excited about my nails when I showed him these! 

If you like this plate you can grab it right here. It sells for about $5.99


Tuesday, May 12, 2015

31 day challenge: Purple nails + bornprettystore review!

Hi y'all! Today I have some more nail art for you all! The next them in the 31 day challenge is purple nails. This is also a double post to review a stamping plate I got from born pretty store. Which was so much fun and so easy to work with.

For these nails I kept it super simple. I used Wet N Wild Who Is Ultra Violet? and Konad black stamping polish. I just used let the base color dry. Then I stamped over it with the stamping polish and nail stamper.

The plate was really awesome! So cute and so fun to use. I like how these turned out so much!

If you would like to grab this plate for yourself, they sell right here for $5.99.

Thanks for reading! Let me know what you thought in the comments below! 


Wednesday, May 6, 2015

Born Pretty Store Stamping Plate L011!

 Hi y'all! I have some more items to review for you all from Born Pretty Store today! They were awesome enough to send me three of their new stamping plates and this is one of the ones I chose to try out! I'm not the best at stamping, and I prefer doing freehand personally so I don't even own a lot of stamping plates, so I honestly can't compare these to much! 

This one was so easy to work with though, the image transferred well, but yeah, my lack of good stamping skills show here. Or it might be my stamper as well, as all I have is the standard konad stamper, I don't have any of the fancy larger stampers, or squishy stampers or any of that. So keep that in mind when deciding if these would be right for you as well. 
 I had so much fun playing with these too and the image was soooo so cute on it. It has to separate parts to it's images. On really large image with multiple different flowers, hearts, dots, etc of all different sizes, just pick the section you like best or you think will fit on your nail and stamp away! 

The other sise has several small images, all little woodland critter themes. Theres pine trees, grass, little red riding hood, the big bad wold, there's some deer, a fox, a squirrel, hedgehog. They are all so cute, but I haven't tried all of those yet. 


You can get this plate Right here and it sells for $3.99

Thanks for reading! Let me know what you thought in the comments below! 


Wednesday, April 22, 2015

Marbles for Polish Sweet Tooth Collection!

 Hi y'all! I have some super cute polishes to share with you all today! I got these Marbles for Polish polishes sent to me to review! I was so excited to get this, they're neon AND Holo, I love all that bright and sparkly-ness in them. Perfect for summer! Unfortunetly it took me a few days to get around to playing with them due to Mister Sun hiding his head in the clouds. I am getting so tired of rain and storms. But anyways, lets get on to the review! 

Thursday, April 16, 2015

Born Pretty Store Loose Glitter!

Hi y'all! These are the last of the Born Pretty Store items for right now! And plus I tried out water marbling again! Aren't they just so neat looking? Amaaazing. I love a water marble look and since I discovered the easiest way EVER. to do one, I will be featuring them SO much more. At least given that I find polishes that work and cooperate with the water! But anyways, onto the point of this post. 

For this look I used Sinful Colors Tempest and Innocent. and the water marble decal method

The glitters are the born pretty store product I have to show you, these little 2mm loose round glitters. I got them in 8# which is a bright neon yellow, (even if they look slightly green here. Think highlighter yellow) and they were really fun to play with even if I suck horribly at glitter placement. 

These are about the same as applying any other loose glitter, so if you suck at placement like I do, these won't be your best friend. (They're def not mine, but I won't get better if I don't try right?) The color was very bright and vibrant, the color of the polish underneath didn't change it at all. And there was no bleeding with the top coat or anything like that. So these would be great if you like to play with loose glitters! 

You can get these right here, they come in a little jar, there are several colors to pick from, and they sell for around $1.78! 

Thanks for reading! Let me know what you thought in the comments below! 


Tuesday, April 14, 2015

Born Pretty Store Full Nail Water Decals!

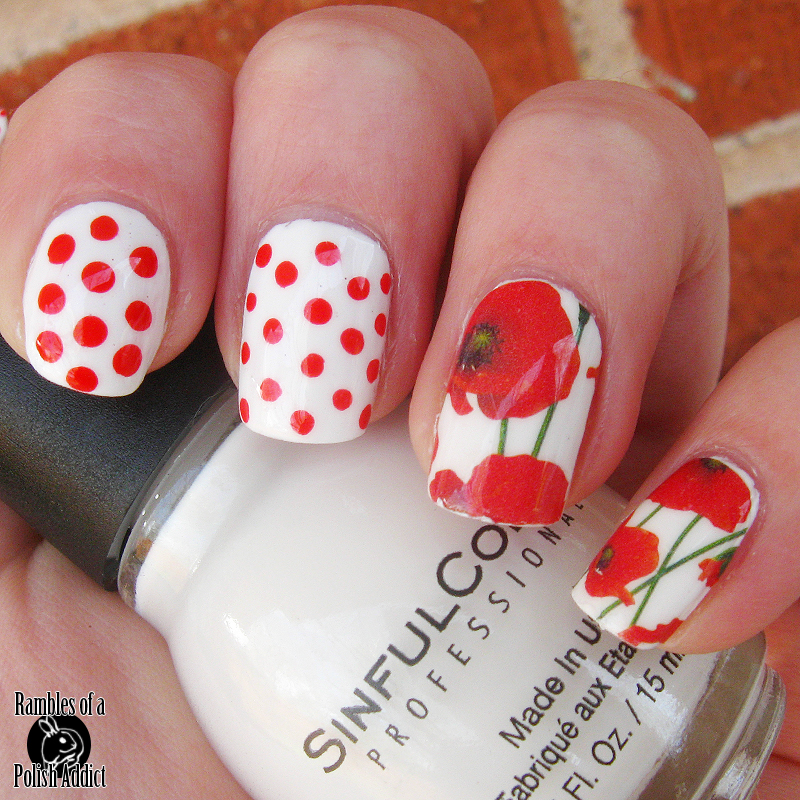
 Hi guys! I have one more born pretty store item to show you all after this! This was sent to me free of charge in exchange for a review and I loooove them! Just look how cute those flowers are! These are so so so easy to use too! This was the first time I used a full nail decal but they were so amazingly perfect and easy to apply! They were a little on the small side though, the smallest two just barely fit the nails I used them on, but they could be used for a partial decal if they're too small for your nails! 

I used Sinful Colors Snow Me White as the base color, and the dots are an LA Colors mini. It came in a two pack with a purple mini and the pack itself was called Bloody Mary but the nail polishes themselves didn't have names on them. 
They came in a package like this, and there are ten decals total and I chose to only use two as an accent for this look. But you could do all ten nails, or only one, if you wanted to. 

They're made super simple to use by the directions on the back of the package. Except for one thing. It says to soak them in water, then slide them onto the nail off the paper backing. This is wrong. If you do this you'll get a solid white decal with the flowers barely showing through from the front. 

What you want to do if remove the protective plastic from the front of the decal after you cut out the piece you want to use. Soak it in water for about 10-15 second. Then either using your fingers or tweezers, separate the paper backing from the decal and place it onto the nail. While it's still wet, slide it around to get it into the right position, (Make sure the polish underneath is totally dry before even starting the decal process), smooth it out to get any kinks and wrinkles out. let it dry, then fold over any excess at the tip and file it away then add your top coat and tada! 

These are super easy, and would be great for those that would love to get more detailed designs, or even just simple designs, but aren't any good at nail art! 

Thanks for reading! Let me know what you thought in the comments below!! 


Tuesday, April 7, 2015

Born Pretty Store Nail Art Pen!

 Hi y'all! I have some more of the Born Pretty Store products that I received to review today! And this fun doodle-y nail art. I was soooo excited about this product when I seen it that it was one of the first ones I decided to pick to review, and since it works AMAZINGLY I just might grab a few more when I get a few dollars to spare. 

Thursday, April 2, 2015

Born Pretty Store Round Resin Rhinestones!

 Hi y'all! Today I have some nail art studs to share with you all from born pretty store! These were sent to me free of charge in exchange for a review! I'm really not great with studs, but these looked cute and fun so I grabbed them in my item pick! 

There were super fun to play with and I loooved the colors! 

Thursday, October 30, 2014

Halloween skittle nails!

**Sent free of charge from Sally Hansen for halloween posts!*
Hi ya'll! Today I have a skittle Halloween look to share with you all! I was sent several goodies from Sally Hansen and NYC for the Halloween season. I'll share a few thoughts on them as well as I loved them all! (Or well most of them) 

First up is the orange I used as a base on several fingers. Sally Hansen Instadri in Pumpkin Queen the formula on this one was amazing! It went on smooth and covered well in just two thin coats. It was also completely dry by time I finished the second hand! 

Second up, over the orange on the thumb is NYC's Rock Muse Smokey top coat. While I looove the idea of these smokey top coats. (Sally Hansen has one now too, correct?) I didn't like that this one had glitter in it. It kinda took away from the smokey effect it's suppose to have, right? At least for me it did. Sooo total bust on that one. Without the glitter it would have been perfect. If you like the glitter in it? Grab it. It did what it was suppose to. 

On the index finger is the Big Glitter Top Coat in Costume glitter by Sally Hansen. I put on two coats over black. Those are two rather thin coats as well and as you can see there is LOTS of coverage. You could probably add a third coat and get nearly full coverage from this glitter if you would like. Or use the sponge method which I still need to try on glitter polishes because I haven't yet! Anyways, if you love glitter, I would totally recommend grabbing this one if you can. There's another one too that has a gold glitter in it. I forget the name though. 

On the middle finger we have Sally Hansens Salon Effects Nail Stickers. The ones I received were called Skull and Crossbones and they are just the cutest and more sparkly little skulls ever! I love the look of them. I'll admit, I was iffy on using them, afraid I'd mess them up. I've never used a nail sticker before. (I also have a set of those real nail polish nail strips from Sally Hansen I have yet to try) But these were super easy to use! Just peel them off, line them up on the nail, and stick them on! Might have to stretch and pull in places a little bit to get out wrinkles and make them fit just right. Just fold the excess over the nail edge and file it off! Easy! I wouldn't recommend these if you're planning on them stayed for some time. I put top coat around the edges of mine like it recommends on the package for longer where, but I still only got about two days out of them. So if you want something cute and quick for a party or other special occasion? These are perfect! But for long term wear, I would skip them. 

Last up, but certainly not least, The pinky! The pinky is a base of the orange and two coats of Sally Hansen Fuzzy Coat in Fur-ankenstein and I loooove it! I love the fuzzy coats so much! I love how much coverage they give! So when I was offered the new Halloween ones I jumped at the chance to try them! There was one other in the set (something witch? was the name? I don't remember now.) and both looked amazing! This is the one I was sent though, and it's little yellow-green and black short bar glitters and looked amazing. Seriously, awesome move making fuzzy coats for Halloween! 

Hope you all enjoyed this post! Let me know what you thought in the comments below!  

Thursday, June 12, 2014

Three shades from the Sally Hansen Rio Collection

Hi y'all! I have the rest of the polishes I received to share with you all today. Today I have three of the eight shades from the Sally Hansen Rio Collection which should be out now. These are all matte glitter toppers in various colors inspired by the Brazil city of Rio. They are all such pretty colors and combinations as well! 

 To start off we have Beach Ball which is a clear base with hex matte red, white, and blue glitters. I really wish these polishes were packed with more of the glitters to get more onto the nail, but I still love them as is. This color really reminds me of something for the 4th of July, so it'd be perfect for your july 4th Manis! These were a bit tricky to apply, there's quite a bit of clear base compared to the glitter and you have to do a lot of dabbing to get even glitter coverage on the nail and it ends up getting pretty thick on the nail if you don't do it just right, but I think the result is worth the trouble. This is just one coat over NYC Amazon Green and no top coat. 

Wednesday, June 11, 2014

Four Shades From the NYC City Samba collection!

Hi y'all! I have some nail polish to show you all from some new summer collections! Looved playing with these. Today I have the NYC polishes from the new City Samba Collection, and tomorrow I'll be posting the Sally Hansen Rio Collection Polishes. These colors were so pretty and I really hope you all like them as much as I did! 

 First up we have Amazon Green a frosty finish blue-green color. It really reminds me of a Cyan Blue. This shot I had to get in direct sun to get the closest to true color on it. My camera hates me lately and these bright colors, it doesn't love as much as I do. One thing I wish was different about this color is the finish, I wish it were just a shimmer, or even a plain ol' creme as the frosty finish I don't really like and it shows brush strokes. Which, it was really brush stroke-y with the first coat, by the second it worked itself out and didn't look as bad. This is two coats with no top coat. 

Friday, May 30, 2014

Marbles for Polish Review!

Hi y'all! I have some swatches to show you all today from Marbles for Polish, a rather new indie brand! She sent me three polishes to review for her, two full size, and one mini, and I'll just start off by saying that I definitely recommend her polishes! I had no issues with them at all and the colors are so cute. But lets just get to the pretty colors and look at them individually! 

marbles-for-polish-goodnight-baby-swatch
Goodnight, Baby star glitter topper.