Showing posts with label sinful colors. Show all posts

Friday, March 25, 2016

Easter Nail art!

Sinful colors pink forever curry up easter bunnies carrots
Hi y'all! I'm actually back again in a timely manner! I totally try I promise! I get behind because I really want to get my school done and it's all online so I could work on it all day every day if I want to. So everytime I go to write up a blog post I'm thinking, "But I could be doing school work. I should be doing school work." and then I forget all about getting the post together because I start in on some math, or some other sort of school stuff and oh well. More important than blogging right? 

Anyways. I wanted to do some cute Easter nails for the holiday sunday, so I put these together and I'm sitting here writing this post while I take a break from school stuff and give my nails some much needed TLC. The base color on these is Sinful Colors Curry Up with Pink Forever as the accent color. I did the bunny and the carrots and dots with acrylic paint and a tiny little detail brush. 

Thanks for reading! Leave a comment below and let me know what you thought!

Wednesday, December 9, 2015

Reindeer and more born pretty store items!

reindeer nail art christmas rudolph red nose
Hi y'all! I'm back again with some more cute Christmas nail art and more brushes from bornprettystore! I had so much fun with these! 

First I started off with two coats of Sinful Colors Social Ladder and then I used some nail art brushes that I recieved for review from BornPrettyStore. The brushes worked great! It was a set of three, with one tiny detail brush, one flat brush, and one angled flat brush. My only complaint is that the detail brush could have been smaller but for filling in larger shapes like on some of the reindeer parts, it was great! I used all acrylic paint for the details of these as well, and the stripes as well! 

You can get the brushes right here for around $4.60, and if you use the code Ring10 you'll get 10% off your entire order! 

Thanks for reading and let me know what you thought in the comments below!

Thursday, May 14, 2015

31 day challenge: Black and White

Hi y'all! I have another part of the 31 day challenge for you all today! The theme this time is black and white. I decided to keep it pretty simple and I love so much how these came out. 

This will also be the last post for a while with all natural nails :( I'll explain that in the next post where I try a new type of post. 

Anyways, onto these nails! I started with Wet N Wild Ebony Hates Chris as my base with Sinful Colors Snow Me White as the base for the accent nail. Any black or white will work the same. 

For the black nails, I made flowers. These were so easy and simple! First, I made the flower shape with a dotting tool and white acrylic paint. Polish will work just the same for this, I just prefer the paint. Next, I used black acrylic paint and a slightly smaller dotting too to make the same shape inside the white one. I left just enough of the white showing to make it look like an outline. Then I dotted white in the center of the flower and put a few dots where the nails looked too empty. 

For the white nails, I used black acrylic paint and a detail brush and just made random triangle shapes all over the nails. I thought these turned out super cute! 

Thanks for reading! Let me know what you thought in the comments below! 

Thursday, May 7, 2015

31 day challenge: Blue nails!

 Hi ya'll! I have some more nail art for the 31 day challenge to share with you all today! These were a lot of fun to do and they follow the 'blue' prompt. I looove blue so I was so excited to work with a blue nail base. 
Has anyone seen this commercial? Surely you have, but this is the best screenshot I could find/get from it, of the item I was after. These nails were inspired by the dress in this commercial. I just LOVE blue and orange together and when I seen this dress I just HAD to do nails like that, perfect fo the blue nail theme too, right? 

For these nails I used Wet N Wild Chambray Showers And Listening ToBlue Reed, as well as Sinful Colors Snow Me White the base color is Chambray showers then I randomly dotted all three colors on a make up sponge and sponged over the nail to get a bit of a textured look. More depth to the look if you will. The flowers were done with Acrylic paint, orange and yellow and various mixes of those two colors to get the shade I wanted for them. Then the centers are dotted in with LA Colors Cactus and I just LOVE how all of these look! So much fun! And I'm getting so much better and more confident in my flowers. Mostly just super duper simple type flowers, but either way, they are flowers and they don't look horrible! 

Thanks for reading! Let me know what you thought in the comments below! 

Thursday, April 23, 2015

31 day challenge: Red nails

 Hi y'all! I have some more nail art for you all today! I have decided to give te 31 day challenge another try so I can have a little bit of inspiration to get myself going again! If this rain ever lets up anyways! I can't get good pictures with all these cloudy overcast skies hidin my sun! 

Anyways, for today's look the theme is Red Nails, and while I didn't want to do full on red nails, plus I don't have many red polishes to pick from anyways since I kind of avoid the color at all costs, I just did these red flowers instead. 

I used Sinful Colors Starfish for the base which is kind of a nude pink color with just a hint of purple. I love how it looks on my nails and I looove the color. It kinda reminds me of a Mauve Crayola crayon. 

The flowers were done with acrylic paint using the one stroke method for the flowers, then I outlines in black to separate out the petals, and added a dot of yellow in the middle. They were really fun and super easy to do! 
Just as a bonus.. I thought it would be fun to show my process when I'm painting. This is what my hands usually look like after my nails are done. At least until they dry enough that I can wash my hands and scrub the paint off. I just use my fingers as sort of a 'pallete' I guess? They're close that the pallette I actually have and so it's easier to just wipe the brush right there once or twice when I end up with too much paint on the brush.. plus so long as it doesn't dry too quickly, i can just dip it right back in there when I need more. 

Luckily, acrylic paint usually just pops right off once you run a little water over it, and if it doesn't, a little soap and rubbing at it does the trick. 

Thanks for reading! Let me know what you thought in the comments below! 

Thursday, April 16, 2015

Born Pretty Store Loose Glitter!

Hi y'all! These are the last of the Born Pretty Store items for right now! And plus I tried out water marbling again! Aren't they just so neat looking? Amaaazing. I love a water marble look and since I discovered the easiest way EVER. to do one, I will be featuring them SO much more. At least given that I find polishes that work and cooperate with the water! But anyways, onto the point of this post. 

For this look I used Sinful Colors Tempest and Innocent. and the water marble decal method. 

The glitters are the born pretty store product I have to show you, these little 2mm loose round glitters. I got them in 8# which is a bright neon yellow, (even if they look slightly green here. Think highlighter yellow) and they were really fun to play with even if I suck horribly at glitter placement. 

These are about the same as applying any other loose glitter, so if you suck at placement like I do, these won't be your best friend. (They're def not mine, but I won't get better if I don't try right?) The color was very bright and vibrant, the color of the polish underneath didn't change it at all. And there was no bleeding with the top coat or anything like that. So these would be great if you like to play with loose glitters! 

You can get these right here, they come in a little jar, there are several colors to pick from, and they sell for around $1.78! 

Thanks for reading! Let me know what you thought in the comments below! 


Tuesday, April 14, 2015

Born Pretty Store Full Nail Water Decals!

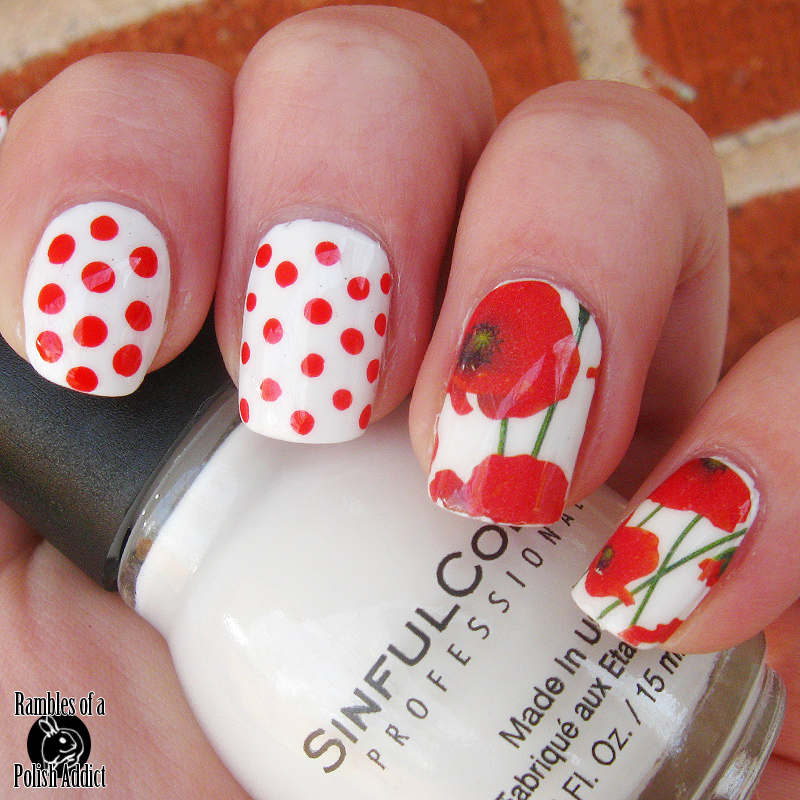
 Hi guys! I have one more born pretty store item to show you all after this! This was sent to me free of charge in exchange for a review and I loooove them! Just look how cute those flowers are! These are so so so easy to use too! This was the first time I used a full nail decal but they were so amazingly perfect and easy to apply! They were a little on the small side though, the smallest two just barely fit the nails I used them on, but they could be used for a partial decal if they're too small for your nails! 

I used Sinful Colors Snow Me White as the base color, and the dots are an LA Colors mini. It came in a two pack with a purple mini and the pack itself was called Bloody Mary but the nail polishes themselves didn't have names on them. 
They came in a package like this, and there are ten decals total and I chose to only use two as an accent for this look. But you could do all ten nails, or only one, if you wanted to. 

They're made super simple to use by the directions on the back of the package. Except for one thing. It says to soak them in water, then slide them onto the nail off the paper backing. This is wrong. If you do this you'll get a solid white decal with the flowers barely showing through from the front. 

What you want to do if remove the protective plastic from the front of the decal after you cut out the piece you want to use. Soak it in water for about 10-15 second. Then either using your fingers or tweezers, separate the paper backing from the decal and place it onto the nail. While it's still wet, slide it around to get it into the right position, (Make sure the polish underneath is totally dry before even starting the decal process), smooth it out to get any kinks and wrinkles out. let it dry, then fold over any excess at the tip and file it away then add your top coat and tada! 

These are super easy, and would be great for those that would love to get more detailed designs, or even just simple designs, but aren't any good at nail art! 

Thanks for reading! Let me know what you thought in the comments below!! 


Sunday, April 5, 2015

Happy Easter!

I got some sparkley text now! Woooot! :D :D It needed a lot of sparkles, lol. 
Hi y'all! I had some Easter nail art for you all today! And Bunday! Me and Valentina are just wishing everyone a safe and happy holiday! Hope you enjoy your dinners and egg hunts, or whatever you do to celebrate the day! And if you don't celebrate Easter, then.. Happy whatever holiday you do celebrate! As you can see, Valentina was not amused by my little photoshoot with her the other night. She's obviously too good for that treatment and should just get treats and head rubs instead. Plus I moved her babies to use in the picture! *Gasp* How dare me. (the stuffed animals you can see behind her, are her babies, lol. Tina doesn't have actualy babies) 
 There were a lot of polishes used here so let me try to remember them all. 

There was Wet N Wild French tip, Tickled Pink, and Retro Mint and then there was LA Colors Bliss, and Daisy and I used Sinful colors Snow Me White under my decals for a base. 

There were so many colors because they just weren't cooperating for the water marble for me at all, so I had to keep trying different ones, but I still had the dried marbled polish laying around, so I ended up just making what I could, work for a decal. I like how they came out actually. I thought the water marble would be sort of like an Easter Egg look. The bunny was painted with acrylic paints. And It's kind of terrifying, so sorry about that. 

Thursday, April 2, 2015

Born Pretty Store Round Resin Rhinestones!

 Hi y'all! Today I have some nail art studs to share with you all from born pretty store! These were sent to me free of charge in exchange for a review! I'm really not great with studs, but these looked cute and fun so I grabbed them in my item pick! 

There were super fun to play with and I loooved the colors! 

Tuesday, March 31, 2015

Giraffe with Zebra accent!

Hey y'all! How is everyone doing today? Hopefully everyone is well! I have some nail art to share with you all today! These are some supoer simple and fun animal print nails! Super simple black and white color scheme as well! 

I started these nails off with Sinful Colors Snow Me White and the rest is done with acrylic paint! I wanted a super simple black and white look, and it's been a while since I've done giraffe print! But I also wanted a bit of a POP of color as well! And this is what came out! 

Thanks for reading! Hope you enjoyed! Let me know what you thought in the comments below!! 

Tuesday, March 24, 2015

Striped and pattterned nails!

Hi y'all! Trying to keep up with this posting regularly trend I've got going here! I've mostly just gotta keep myself editing and writing this posted in a timely manner! I let time get away from me most of the time! Anyways, I have these.. I don't know what to call them? Stripes with a geometric print? Hmm? Any thoughts on what to call them? Anyways. I really enjoyed doing these so I hope you like them as well! 

I started this off with my base color LA Colors Meadow and then I added a strip down the middle with Sinful Colors Snow Me White before adding LA Colors Flicker on top of that! I used the white to make sure the neon yellow really *POPPED* over the teal-ish color. 

When that was dry, I took my detail brush, and I mixed a dab of black with my metalic white acrylic paint to make a silver color, then I added a zig zag pattern over the yellow, and then two stripes down the side of the thick yellow one. They were so fun! And made me sooo so ready for summer! I'm tired of this rainy and cold weather! 

Thanks for reading! Hope you liked it! Let me know what you thought in the comments below! 

Thursday, March 19, 2015

Double dotted dotticure!

Hi y'all! I promise I'm trying to get into the hang of posting regularly! I will get it eventually! I just need more inspiration for nail art that doesn't involve doing the same thing over and over again. That gets boring, amirite? Anyways, I have these dotted nails to show you all today! 

Base color is Sinful Colors Tempest and then I used a dotting tool and two different colors to dot. The pinky got a little wonky, I think there was something stuck to my dotted and it wouldn't dot right :( But the dot colors are Teal: LA Colors Seafoam, Pink: Pumpin' Pink and I LOVED the color combination on these so much! 

Thanks for reading and hope you enjoyed the post! Let me know what you thought in the comments below!

Thursday, February 12, 2015

Funky French Valentines!

Hi y'all! I have some cute valentine nail art for you all today! Also bright and fun because I miss the sun! Please come back soon sun! Haha. Anyways. Valentines day is coming up in a couple days and I decided to do something fun for the occasion! 

For this look I used Sinful Colors Soul Mate (Kinda perfect for the day of love, right? I didn't pick it on purpose haha) and for the accent nail, I finally put my Funky Fingers Glitter Matters to use! the purple and yellow were done with acrylic paint. I used a dotting tool to dot along the french tip (also freehanded. i couldn't find my tape?) and the round parts of the hearts were also done with a dotting tool, and then a detail brush to drag the two shapes together in a V shape to form the heart. Super easy and loved how cute these came out! 

Hope you all enjoyed these as much as I did! Let me know what you thought in the comments below! 

Tuesday, February 10, 2015

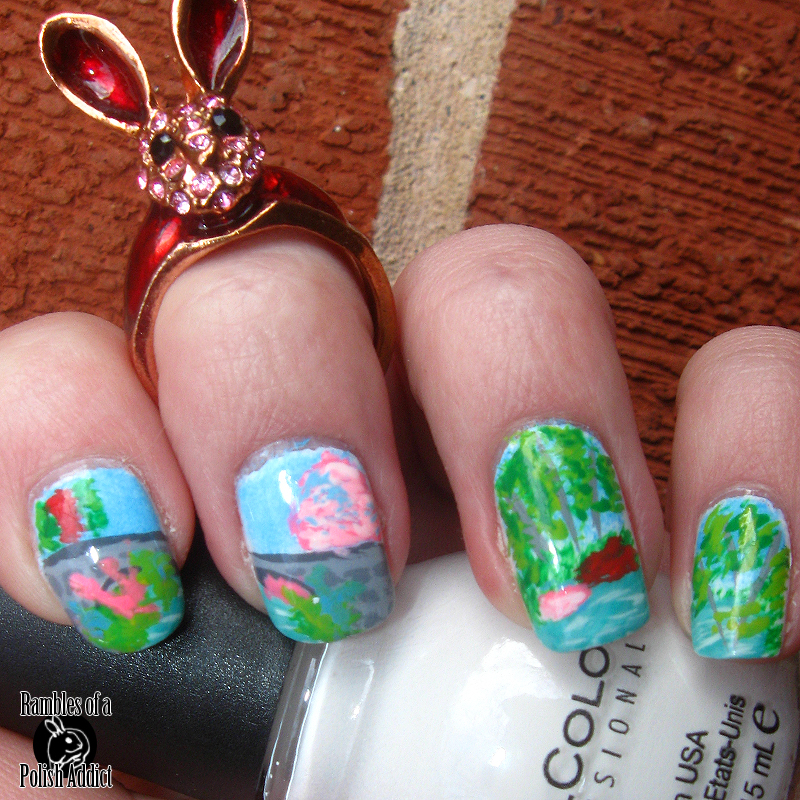
Bridge and pond landscape nails!

Hi y'all! New week here at the blog which means some new nail art for you all! I tried my hand at some landscaping nail art again, had these in my head for I don't know what reason. I probably seen someone else so (a much better version of) it and get it in my head that I could do it justice. Though... these didn't turn out at all the way I was hoping, I was really happy with them. 

For this look I started with Sinful Colors Snow Me White as a base, and everything else is done with acrylic paints and a detail brush. 

Hope you all enjoyed these as much I did wearing them! Let me know what you thought in the comments below. 

Thursday, February 5, 2015

Anti-Valentine day nail art!

Hi y'all! I have some more fun nail art to share with you all today! Really loved the accent nail on these the best! Sooo cute and the glitter and base color looked like they were made for each other!!! Please ignore the pinky, I swear they were fully dry but by time I got around to pictures, it was all smudged and wrinkley. 

For this look I started out with my base color Sinful Colors Enchanted and the accent nail is Wet N Wild How I Met Your Magenta which I topped off with 3 coants of Sinful Colors Decadent. I used Sally Hansen Big Glitter Top Coat MeteorLight on the pinky. The rest was all done with a detail brush and acrylic paint. I just make broken heart shapes and polka dots whitch I used white to make stand out more. 

Hop you all enjoyed these as much as I did! Let me know what you thought in the comments below! 

Tuesday, January 27, 2015

Black and White monochrome nails!

Hi y'all! Today I have some more nail art for you all! I guess you could call these Valentine's day nail art? If you wanted to. You could also leave the heart off and just leave the black and white pattern as it is. These are just super simple monochrome nails! Use just one of the patterns, or try them all! 

I started these off with Sinful Colors Snow Me White as the base color, and then I used my trusty nail art brush and acrylic paint for the details. I started with the patterns just making various black lines. These are so simple to do! Anyone could do them! Just lines! Once that was dry, I used a dotting tool and pink paint to make the little hearts. I like the small pop of color. Then I added a couple of little mirco beads! Which.. I kinda wish I'd left off, I thought they'd look better than they did. But oh well, live and learn, right? 

Hope you all enjoyed these as well! Let me know what you thought in the comments below! 

Thursday, January 8, 2015

Glitter Gradient!

glitter gradient sinful colors sally hansen tempest big glitter top coat
H y'all! I have some more stuff to share with you today! These were some reviews I have to share with you. I got some of the holiday Big Glitter Top Coats from sally hansen but I just not got around to posting about them. (Of course.. I got them kind of late last month too so oh well) but they're so pretty! I used two of them here in this look. 

I started with two coats of Sinful Colors Tempest and New York Color Tropicoral. and then I used the Big Glitter Top Coats to make a gradient on the tips of the nails. I used Goldi-flecks on the purpble and MeteorLight on the bright coral. I thought they can out really pretty! Formula is pretty much the same on them both, not as densely packed as the other Big Glitter Top Coat's I've tried so far but definitely have plenty of glitter in them. I did use a sponge to sponge the glitter onto the tips more densely to create the gradient. But there was plenty of glitter added with just a normal 1-2 coats if you just wanted to add some sparkle to your look! 

Hope you all enjoyed this! Let me know what you thought in the comments below! 

Tuesday, January 6, 2015

Snowflakes on Gradient background!

Hi y'all! I have some more nail art to share with you all today! And starting today I will hopefully be getting into a regular posting schedule while I explained in my last post here. I hope everyone had a good Holiday, Merry Christmas and Happy New Years and all of that! We've made it through another year! How exciting! And look at that cute ring I get to start the year off including in pictures! I got it from BornPrettyStore for less than a dollar which was awesome. Even if it did take four weeks to get, haha. But let me stop rambling and get on to the nail art. 

I started these off with one base coat of white Sinful Colors Snow Me White but any white you have will get the job done. Then I use a make up sponge and LA Colors Meadow and Seafoam along with Snow Me White to make the gradient. I then topped that with one coat of Creations By Lynda Rainbow In The Dark (even though you can't really see it) and one coat of Sally Hansen Pearly Whites. Annnd then for the snowflakes I used a tiny little detail brush and blue and white acrylic paints. I really loved how these came out too! 

Hope you all enjoyed these! Let me know what you thought in the comments below! 

Tuesday, October 21, 2014

Halloween Patch Work!

Hi y'all! Today I have some simple fall patch work nails to share with you all! These didn't come out exactly the way I was hoping they would, but they were still super cute and I loved them a ton. 

And the pictures came out ALL WRONG. Why? Because the camera was used for something else during the week and I forgot to switch the settings back. Why didn't I just fix this? I didn't even notice until I went to edit pictures today. So, please excuse the odd coloring on the picture. 

Anyways! I used Sinful Colors Snow Me White as the base color for these and the green is La Colors Mint And the rest of the colors were done with acrylic paints and a tiny little detail brush. Super fun halloween and fall type colors! 

Hope you all enjoyed these as much as I did! Let me know what you thought in the comments below! 

Thursday, October 9, 2014

bloody nails!

Hi y'all! I got a little behind on blog stuff with the recent storm here in the area, we spent a few days without power so I couldn't do much of anything besides stare at a wall or sleep and hope the power was fixed when I woke up. (It never worked that way. Never. Sigh.) But I have a few posts to line up that I did before that whole fiasco, to which this is one of them. Some bloody, battered, zombie like nails. Not really sure what else to call them. I did them last year as well and to be quite honest, I'm pretty sure that I liked last years better than the ones I did this time around. I loved them so much last time though I had to try again. Anyways, click through the jump to read more!