Hi y'all! I have some more of the Born Pretty Store products that I received to review today! And this fun doodle-y nail art. I was soooo excited about this product when I seen it that it was one of the first ones I decided to pick to review, and since it works AMAZINGLY I just might grab a few more when I get a few dollars to spare.
Showing posts with label nails. Show all posts
Tuesday, April 7, 2015
Thursday, April 2, 2015
Born Pretty Store Round Resin Rhinestones!
Hi y'all! Today I have some nail art studs to share with you all from born pretty store! These were sent to me free of charge in exchange for a review! I'm really not great with studs, but these looked cute and fun so I grabbed them in my item pick!
There were super fun to play with and I loooved the colors!
Thursday, February 26, 2015
Creations by Lynda Hope Springs Eternal Collection!
Hi ya'll! I've got some new polish to share with you all today! These are all from Creations by Lynda and will be released within the next few days! And I highly recommend you run and grab them as soon as you can if you're looking for some new spring polishes to add to your collection!! There are six polishs total in the collection, 4 creme colors, and 2 glitter toppers and I just LOOOVED all of them so much.
First is April Showers which is described by Lynda as a blueish gray with a hint of purple and a slight shimmer from spectraflare. To me it's a purply blue.. kind of a periwinkle maybe? A pale dusty periwinkle. The second photo below shows it closer to the color it is in person, but my camera was having a hard time deciding if it was purple or if it was blue. This is two easy coats shown with no top coat. Application was easy and it dried quick. There was a bit of pulling on the first coat.. but that could have just been me, or possibly the mini bottle brush. It evened itself out just fine on the second coat easily enough though, so no big deal at all. If it weren't for that, I almost could have gotten away with just one coat with these! Also, I promise the shimmer is there in person, but it's very subtle and my camera just refused to pick it up. (same goes with all of these colors!)
Tuesday, February 24, 2015
ORange skittle nails!
Hi y'all! I have some more nail art to share with you all today! I wanted something a little more bright and summery, and we'd had some nice weather for a couple days so it was the perfect time! Plus, my mom had bought me a couple new polishes and I needed and excuse to use them.
I started this off with two coats of LA Colors Orange Crush and I had wanted daisies, but I don't know what happened. they came out looking more like fried eggs, haha. Then I did stripes on the pinky, and I've never done chevron stripes so I really wanted to try them out! All the details were don't with acrylic paint.
Hope you all enjoyed this as much as I did! Let me know what you thought in the comments below!
Thursday, February 12, 2015
Funky French Valentines!
Hi y'all! I have some cute valentine nail art for you all today! Also bright and fun because I miss the sun! Please come back soon sun! Haha. Anyways. Valentines day is coming up in a couple days and I decided to do something fun for the occasion!
For this look I used Sinful Colors Soul Mate (Kinda perfect for the day of love, right? I didn't pick it on purpose haha) and for the accent nail, I finally put my Funky Fingers Glitter Matters to use! the purple and yellow were done with acrylic paint. I used a dotting tool to dot along the french tip (also freehanded. i couldn't find my tape?) and the round parts of the hearts were also done with a dotting tool, and then a detail brush to drag the two shapes together in a V shape to form the heart. Super easy and loved how cute these came out!
Hope you all enjoyed these as much as I did! Let me know what you thought in the comments below!
Tuesday, February 10, 2015
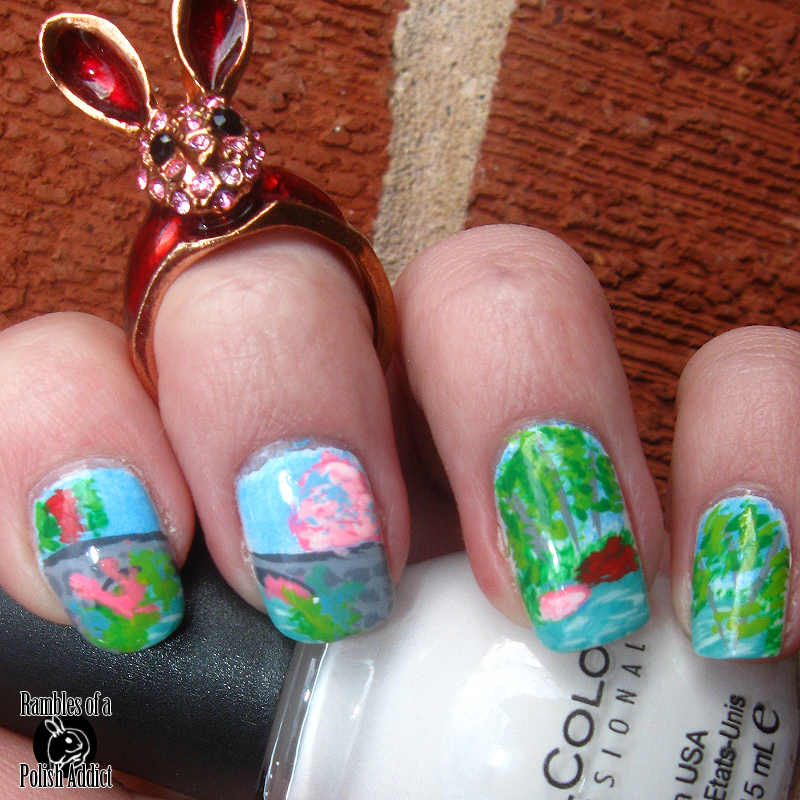
Bridge and pond landscape nails!
Hi y'all! New week here at the blog which means some new nail art for you all! I tried my hand at some landscaping nail art again, had these in my head for I don't know what reason. I probably seen someone else so (a much better version of) it and get it in my head that I could do it justice. Though... these didn't turn out at all the way I was hoping, I was really happy with them.
For this look I started with Sinful Colors Snow Me White as a base, and everything else is done with acrylic paints and a detail brush.
Hope you all enjoyed these as much I did wearing them! Let me know what you thought in the comments below.
Thursday, February 5, 2015
Anti-Valentine day nail art!
Hi y'all! I have some more fun nail art to share with you all today! Really loved the accent nail on these the best! Sooo cute and the glitter and base color looked like they were made for each other!!! Please ignore the pinky, I swear they were fully dry but by time I got around to pictures, it was all smudged and wrinkley.
For this look I started out with my base color Sinful Colors Enchanted and the accent nail is Wet N Wild How I Met Your Magenta which I topped off with 3 coants of Sinful Colors Decadent. I used Sally Hansen Big Glitter Top Coat MeteorLight on the pinky. The rest was all done with a detail brush and acrylic paint. I just make broken heart shapes and polka dots whitch I used white to make stand out more.
Hop you all enjoyed these as much as I did! Let me know what you thought in the comments below!
Labels:
accent nail,
glitter,
hearts,
nail art,
nails,
pink,
purple.,
sally hansen,
shapes,
sinful colors,
wet n wild
Thursday, January 29, 2015
Dotticure pattern!
Hi y'all! I have some intricate looking dotted nail art to show you all today! I wanted a blue/orange combination when I set out to start this manicure and I really like how it turned out!
I started with my base color Wet N Wild The Clock Strikes Orange and Chambray Showers for the accent nail. I used a dotting tool and various acrylic paint colors to make the design!
Hope you all enjoyed this as much as I did! Let me know what you thought in the comments below!
Thursday, January 22, 2015
Chalkboard Doodles!
Hi y'all! I have some new nail art to share with you all. Something I'm a little late to the party with, but oh well, right? I've been wanting to try 'chalkboard' nails and finally got around to it! These were so fun and simple to do! And I love how just anyone can do them because they most definitely don't need to look perfect!
I started these out with two coats of Wet N Wild Ebony Hates Chris and then once that was try, I used pink and purple acrylic paints to make little random chalkboard type doodles. Even mode it so it looked more like chalk by makes it not totally opaque in some spots. Then I topped them all off with my trusty Wet N Wild matte top coat!! Had so much fun with these. The thumb was probably my favorite one!
Hope you all enjoyed these as much as I did! Let me know what you thought in the comments below!
Labels:
doodles,
fun,
matte finish,
matte nails,
nail art,
nails,
wet n wild
Thursday, January 15, 2015
Polar Bear Nails!
Hi y'all! I have some more nails to share with you all today! These were suppose to be some Polar bears and cold snowy sort of thing. The cold and snowy thing worked well... but those don't really look like polar bears? Some sort of cute little creature maybe! Maybe a ferret? I don't know. I think it came out cute, just not as what I meant for it to be, lol.
Any ways, I use LA Colors Blue Icicles for this look. It was really sheer! It took three coats to get it this opaque and it probably could have used one more to get even better coverage, I'd probably recommend four if you were wearing it alone, but since I was covering most of it with art. There was a LOT of glitter pay off in that bottle too! The little critters were painted with acrylic paint and a detail brush.
Hope you all enjoyed this look! Let me know what you thought in the comments below!
Thursday, September 26, 2013
NYC New York Color Swatch and Review post
So, I have some more swatches for you today! These were sent to me along with the Sally Hansen ones because they're owned by the same company and when I asked about getting Sally Hansen Samples, I was offered these as well. And I love them. These are my first NYC's in a long time. I wish there were places closer by that sold them around here. My Walgreens doesn't have them, and I always forget to check whenever we go to walmart. But anyways, to the swatches.
**These polishes were sent to me free of charge in exchange for my honest opinion**
The first one we have is Black Lace which is just your standard black cream, Nothing really special at all about it. We also have their Matte Me Crazy Mattifying top coat. Which is AMAZING. Here is two coats of Black Lace and One coat of the Matte Top Coat on the pinky and middle fingers. You can definitely tell a huge difference. I can only really compare it to the Klean Kolors one that I hve as I haven't used any other matte top coats, but this one is soo much better than Klean Kolors one. The one dries quick, really takes the shine away and matte's it out. I love it. I love the formulas on both the black and the top coat as well. They applied evenly and smooth without any effort at all.
This one is their Sparkle effects top coat. It's listed on the website as Big City Dazzle but there's no name on the bottle, and according to the website, there's only one of these so the name of it isn't really needed unless they add more to the line. It's really pretty, probably better over other colors but I just threw it on over Black Lace. This is two coats on the ring and index fingers, and only one coat on the other nails to compare. I really like it a lot. It was also really easy to apply, went on smooth and the glitter covered evenly without any effort or dabbing where you wanted it to go.
Last, but now least, we have Wing It Wine which is a coppery colored shimmer polish. It's more bronzing I suppose? I'm not sure how to describe the color, other than I have nothing like it in my collection so I was excited to see it in the package. Those cracks you see by the way, has nothing to do with the polish and everything to do with it not liking the glue base coat, or me being too impatient, I'm not sure which. This color is so pretty though and it went on smooth and even without any effort. This is two coats shown with no top coat.
**These polishes were sent to me free of charge in exchange for my honest opinion**
What do you think of these polishes? Let me know in the comments below!
Friday, August 9, 2013
Shark nails for shark week!
A little late since Shark Week is almost over I'm pretty sure. It makes me wish we had cable and I could actually watch it, but considering Netflix gets Shark Week, well, I just have to be patient or watch shows from past years if I reaaaally want to see them. I do watch them every so often when I get bored. But animals in general have always fascinated me, and the documentary movies are amaazing. I love learning things about them. The disneynature movies I can't get enough of, and I especially love March of the Penguins. But.. I'm getting off track now..
I've seen a few other nail bloggers do looks for Shark Week in different face book groups and whatnot, and I thought it looked like fun and really easy to do. But I didn't want mean looking sharks on all my nails, and I was feeling lazy, so I kept it simple with just an accent Shark.
I started with my Sinful Colors base coat and then taped off with scotch tap and used Wet 'N' Wild Wild Shine A Blank Canvas to make the french tip. Just your classic white french tip. This I used acrylic paints to create the shark on my ring finger. I'm really happy with how these came out.
What do you think of these nails? Favorite part about Shark Week? Do you watch Shark Week? Let me know in the comments below!
Thursday, August 1, 2013
Orange and blue dot look!
Hi y'all! I finally have another post for you guys! I've been a little lacking on the posts lately, I've been doing a look and actually wearing it for nearly a week, and leaving my nails somewhat natural for a few days in between. GASP. Shocking for a nail blogger to do that, I know. But it's nice having a break from the challenges and just posting at my own pace right now. I'm thinking I'll be back in challenge mode by october though because I definitely want to find or host a good halloween challenge. Love halloween so much.
Anyways, today I have this simple dotted look for you. I did this using mostly just the wet n wild pop art craze polishes. I used The Clock Strikes Orange for the base and Listening To Blue Reed, and Teal Slowly And See for the blues. I just dotted over randomly with both colors, and on the accent nail I used striping tape in a quilted pattern and just filled in some of the diamonds with the blues. I topped the whole thing with China Glaze Fairy dust and learned that one coat of that stuff is plenty. What you see here is two coats. Not my best idea. But I really like how these came out overall! I didn't think I would, when I do random dotting over the nail like this, it rarely comes out right, but this all came together nicely and I love it. I'm sad actually that it'll have to come off soon.
Let me know in the comments below what you think of this look!
Monday, July 15, 2013
Summer Beach nails!
Hi guys! Today I have a super fun summery beach mani to show you! I meant to have this up much sooner but it was just a busy weekend. We had a movie night in the backyard with all my cousins and they're kiddos, and my sis and nieces and nephew too, saturday night. Which turned into a much longer night than it needed to be, but I'll spare the details of that. Lets just say I didn't sleep much and didn't feel like doing anything yesterday, which is when I meant to get this up. But anwayyys.
For this look I started with a base color of Wet 'N' Wild I Need a Refresh Mint and then in the middle for the water I used LA Colors Aquatic and for the sand I used LA Colors Whipped and all the rest of the details were done with acrylic paints. Little crabs and starfish, and blankets and flip flops, and even little buckets and shovels. I looove how these came out! I'm actually still wearing them right now, but they're chipped and need to be taken off which I'm doing here in a little while.
What did you all think of this look? Is it something you would try? Let me know in the comments below!
Tuesday, June 4, 2013
Osis dust it hair powder and Broadway nails imPRESS press on nails review
A couple weeks ago I got my second box from Influenster.com. The spring fever vox box, and it had quite a few fun items in there. I haven't gotten around to writing about or using some of the things just yet, but I bring you two of them today! So, let's get on with the review.
And for those of you that don't know what influenster is, it's a website where you can earn badges for filling out surveys and writing reviews on products to up your score, the higher your score the more likely you are to qualify for boxes. When you're picked, they send you a box full of different items to try, test, and review, and the voxbox badge has different things to do for the box like posting a picture of it to instagram, twitter, etc, and there's activities to do for each item in the box as well.
Sunday, March 10, 2013
easy Polish Removal
Do you love painting your nails and hate removing the polish? Or does it seem to take forever to remove it? Maybe you use three or more cotton balls to scrub off all that glitter in your favorite polish. Whatever the reason. I just might have a solution!
![]() |
| Acetone, nail scissors, and a cotton ball. OH, |
The picture to above? This is the ONLY thing you need to remove your polish fast and easily with only one cotton ball. Just one. That's it. I Haaated removing polish before I found this way of removing it. Also, if you'd rather use non-acetone or regular nail polish remover instead of pure acetone, you just have to wait a little bit longer for the cotton pieces to sit on the nails once dipped in you're remover of choice. Keep reading to see more on this.
Sunday, March 3, 2013
Nightmare before Christmas nails
This is one of my favorite movies, ever. I'll watch it all the time. I love Tim Burton in general, but I grew up watching nightmare before christmas, and after seeing these I just HAD to give them a try and see what would happen.
I started out with my base colors, going from index to pinky we have china glaze re-fresh mint, an la colors silery gray colors, la colors mini in white, and sinful colors rain storm. i just painted the thumb a black.
I did all of my details with acrylic paint, sponges, striping brushes, and detailing brushes. Then for the thumb I used striping tape to get more precise lines. and striped with black and white.
For the other hand, I only did the black and white stripes and Jacks face on the ring finger. It took long enough to do this hand like this, and with all the details, i wasn't even about to try doing both hands.
Thursday, February 28, 2013
flip flop february day 28: Recreate your favorite day
Todays theme for the last day of flip flop february is to recreate your favorite day, and I went with recreating day 21 with dots! Not necessarily my favorite, but one of them, and I couldn't decide on a favorite so I just picked one.
And I don't know what's up with the lightning the last couple days, I think maybe the sun isn't coming in my window properly like usual. But anyways. For this look I used la colors daisy for the yellow base, and then used la colors in pink bubbles just a very bright barbie type pink, and made a diagnal strip across the nail. Then used a dotting tool for the dots.
Sunday, February 24, 2013
Flip Flop February day 24: Tissue Paper/Rainbow
for the challenge, we have tissue paper or rainbow nails. I don't have any tissue paper, although I really want to try that technique, so maybe another time on that one, but I had an idea for rainbows floating around in my head for quite some time now, so I finally had a reason to do it!
See more of these nails after the link below!
Saturday, February 23, 2013
Flip Flop february day 23: linghtning/bows
The theme for day 23 of the flip flop february challenge is lightning nails or bows. And I really liked the idea of lightning nails, and the look of them when I looked them up. So here we go! Plus.. even though bows is the one on the easy side of the challenge.. I SUCK at making them so. I need to practice that, haha. Click the link below to see more of these nails and how I did it.
Subscribe to:
Posts (Atom)